> ## Documentation Index
> Fetch the complete documentation index at: https://help.kajabi.com/llms.txt
> Use this file to discover all available pages before exploring further.
# Create a Course paywall
> Add a paywall to a Course to gate content and drive conversions.
A **Course paywall** for a Course and Modules provides potential customers with a preview of your Course, while encouraging them to purchase and unlock all the valuable lessons you have to offer.
A Course paywall lets you offer a preview of your content to potential customers while keeping the rest locked until they purchase. You can place the paywall between modules to control how much free content is accessible.
This method not only helps you convert free users into paying customers, but it also creates a sense of urgency and exclusivity. With this approach, you can:
* **Increase conversions:** Offering a preview of your Course helps build trust and demonstrates the value of your content. When customers see how much value you provide in just a preview, they're more likely to buy the full course.
* **Leverage lead magnets:** By offering a free or discounted portion of your Course content as a lead magnet, you can capture potential customers' interest and lead them down the sales funnel to purchasing the full course.
* **Enhance accessibility:** With a paywall, customers have the flexibility to access a portion of the content at no cost before deciding whether to make a full purchase.
## How Course content is protected
Content behind a paywall is secured before it is rendered on the page. If a user attempts to bypass the paywall using technical methods, they will not be able to view any restricted content. The following content types are protected:
1. **Videos and audio files**
2. **Written lesson content**
3. **Comments**
4. **Downloads**
Actions such as marking lessons as complete or favoriting are also disabled for users without full access.
**Important:** Video and audio content added to a lesson is **view-only** for those who have access. Customers can only download files uploaded as attachments under the Downloads section of a lesson.
## Add a paywall
1. From the Dashboard, click **Products.**
2. Click **Courses.**
3. Select the **Course** you want to update.
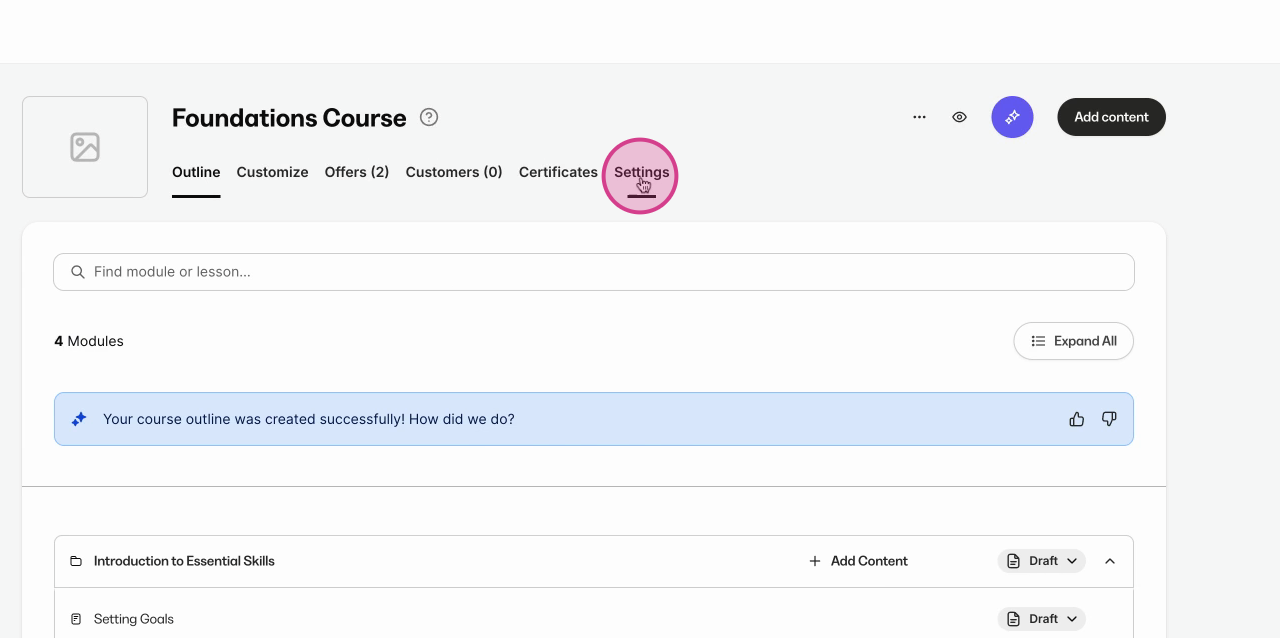
4. Click **Settings.**
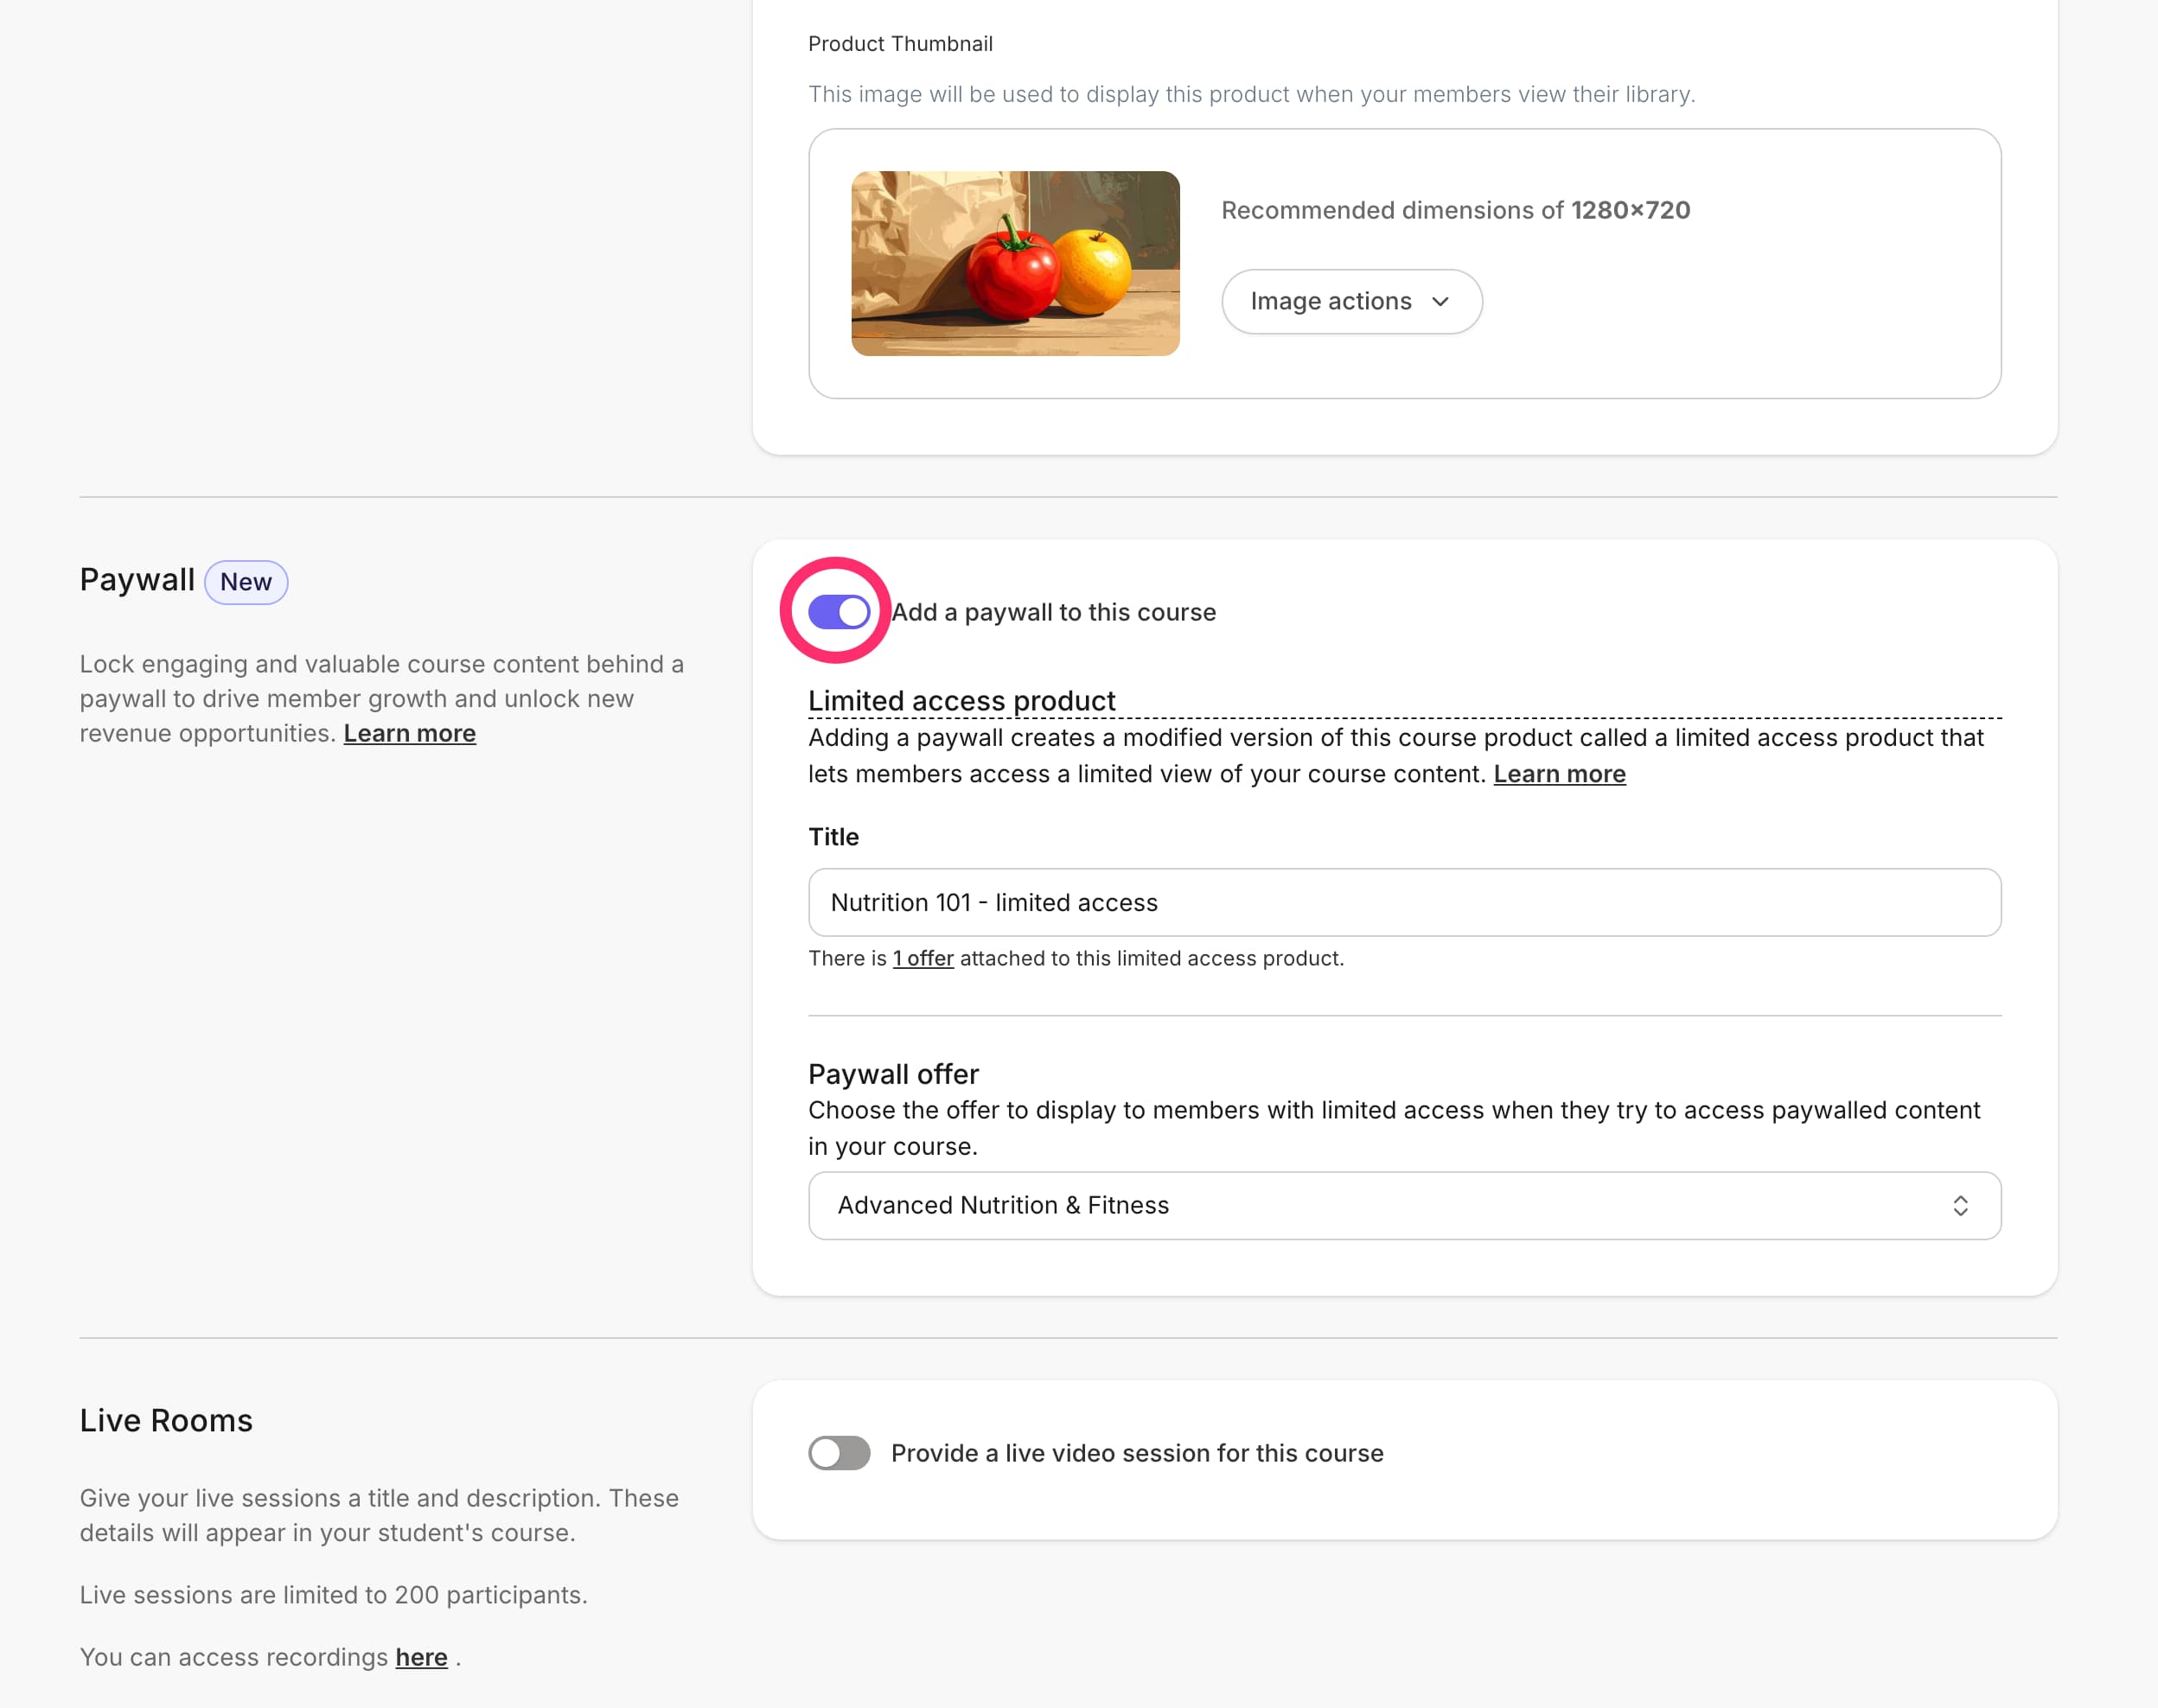
 5. Scroll down and toggle on **Add a paywall to this course.**
6. In the **Title** field, enter a name for the free Offer customers use to preview your Course. Kajabi creates this Offer automatically when you save.
7. Under **Paywall offer**, choose which **Offer** is shown to members when they try to access content behind your paywall.
8. Click **Save changes.** Kajabi automatically generates a limited-access version of your Course, typically labeled as "\[Course Name] - limited access," attached to the free Offer you created.
5. Scroll down and toggle on **Add a paywall to this course.**
6. In the **Title** field, enter a name for the free Offer customers use to preview your Course. Kajabi creates this Offer automatically when you save.
7. Under **Paywall offer**, choose which **Offer** is shown to members when they try to access content behind your paywall.
8. Click **Save changes.** Kajabi automatically generates a limited-access version of your Course, typically labeled as "\[Course Name] - limited access," attached to the free Offer you created.
 **Note:**
1. Make sure the Offer you select is published and active so visitors see the correct pricing and access.
2. Toggling the paywall affects who can open paywalled lessons — double-check your course **Access Settings** after saving.
3. Ensure that the correct offer is selected in the original Course's settings to make it visible in the paywall dropdown.
## Manage a paywall
Move the paywall within your Course outline to control which content is freely accessible and which requires purchase. If you need to adjust access levels, create a new unrestricted Offer rather than modifying existing restricted Offers.
1. From the Dashboard, click **Products.**
2. Click **Courses.**
3. Select the **Course** with the paywall enabled.
4. Hover your mouse over the **Paywall indicator** in the Course outline\*\*.\*\*
5. Then, drag and drop it to your desired location.
**Note:**
1. Make sure the Offer you select is published and active so visitors see the correct pricing and access.
2. Toggling the paywall affects who can open paywalled lessons — double-check your course **Access Settings** after saving.
3. Ensure that the correct offer is selected in the original Course's settings to make it visible in the paywall dropdown.
## Manage a paywall
Move the paywall within your Course outline to control which content is freely accessible and which requires purchase. If you need to adjust access levels, create a new unrestricted Offer rather than modifying existing restricted Offers.
1. From the Dashboard, click **Products.**
2. Click **Courses.**
3. Select the **Course** with the paywall enabled.
4. Hover your mouse over the **Paywall indicator** in the Course outline\*\*.\*\*
5. Then, drag and drop it to your desired location.
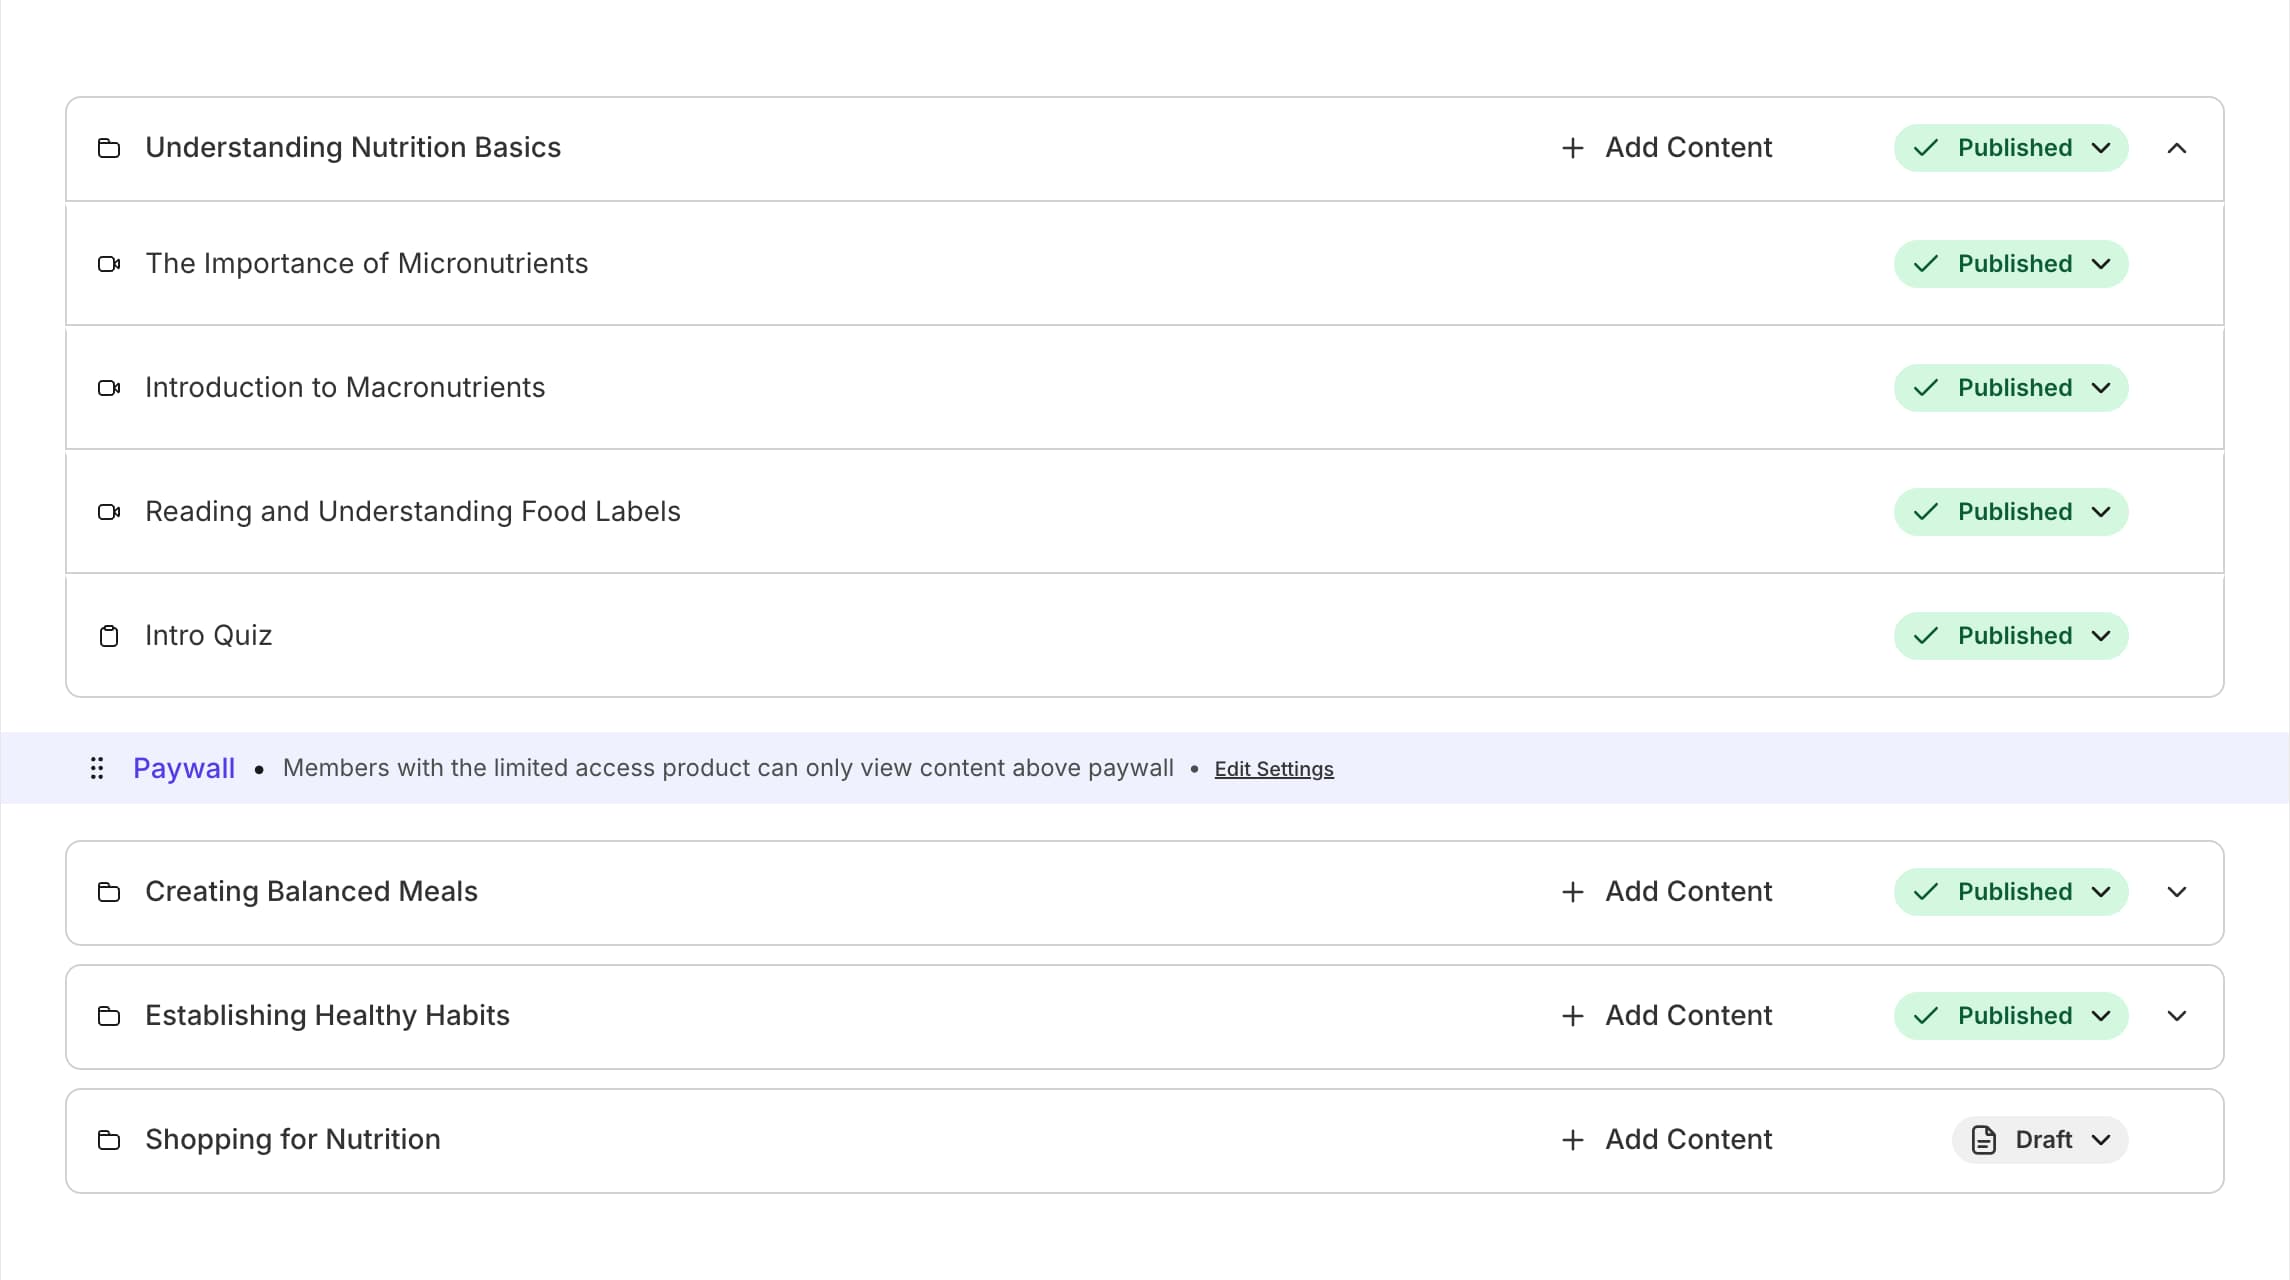 **Note:** Paywalls can only be placed between modules.
## Customize the paywall pop-up modal
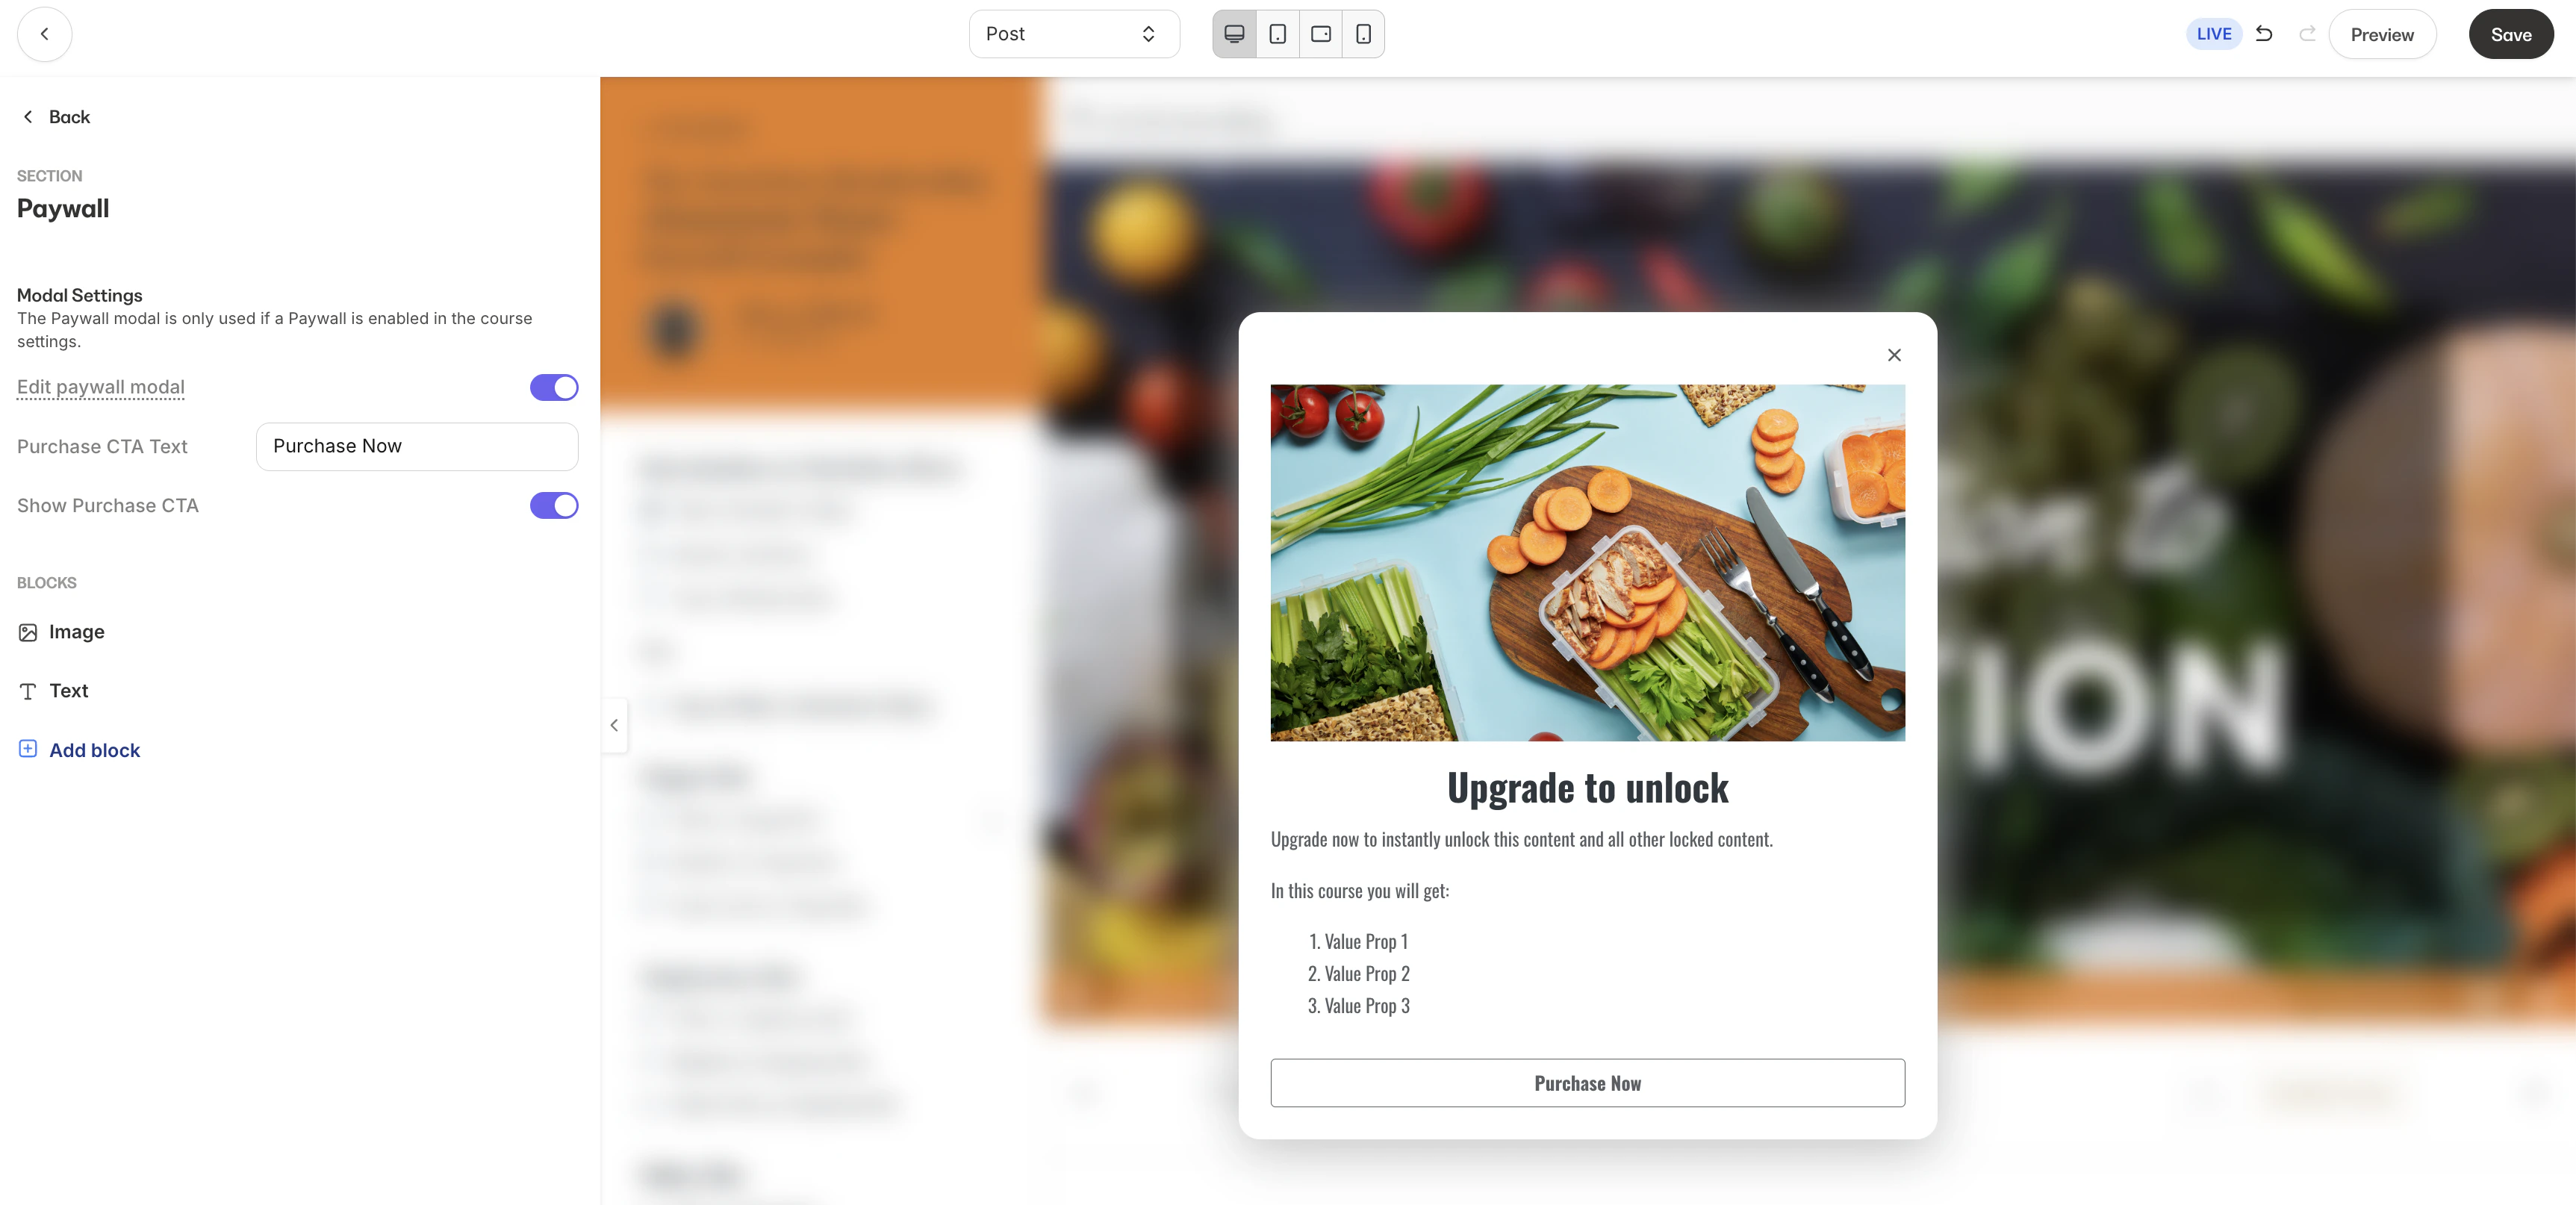
When a lesson is locked by a paywall, students will see a pop-up modal prompting them to purchase or upgrade their access. You can customize this modal within your Product theme editor.
**Note:** Paywalls are only supported on the **Premier** and **Momentum** product themes.
**Note:** Paywalls can only be placed between modules.
## Customize the paywall pop-up modal
When a lesson is locked by a paywall, students will see a pop-up modal prompting them to purchase or upgrade their access. You can customize this modal within your Product theme editor.
**Note:** Paywalls are only supported on the **Premier** and **Momentum** product themes.
 ### Customize a paywall modal
1. From the Dashboard, click **Products.**
2. Click **Courses** and open the Course you want to edit.
3. Click **Customize** to open the product theme editor.
4. Confirm that your product is using either the **Premier** or **Momentum** theme. If not, switch to one of these themes to access paywall customization.
5. In the theme editor, use the dropdown at the top of the page and switch from **Product** to **Post.**
**Note:** After switching to Post view, the **Paywall** option will only appear in the left sidebar if you have a paywalled lesson selected. If you do not see **Paywall** in the sidebar, click into a lesson that is locked behind the paywall and the option will appear.
6. In the left sidebar, click **Paywall.**
7. Toggle on **Edit Paywall Modal.**
8. Add and arrange any custom blocks you would like to display in the modal.
9. When you are finished editing, toggle off **Edit Paywall Modal.**
10. Click **Save** to apply your changes.
## Preview the paywall modal
1. Return to your **Course** outline
2. In the top right corner, click the eye button to **Preview**
3. Select **Preview Limited Access**
4. Click into any locked lesson to view your paywall modal
Your updates will now display whenever a student attempts to access a lesson restricted by your paywall.
## Marketing with a Course paywall
Using a paywall as a **lead magnet** is an effective strategy for driving new customers to your Course. Here's how you can use your paywall to capture interest and convert visitors into paying customers:
* **Offer a preview module or lesson:** Allow potential customers to access the first module or a specific lesson in your Course for free. This allows them to experience a part of the value you provide without giving away everything.
By default, your Course paywall will be created directly below the first module. However, you can adjust the placement to best fit your Course.
* **Create a sneak peek video:** Provide a sneak peek video or webinar that introduces your course content. After the preview, prompt users to unlock the rest of the course by purchasing.
* **Set up a limited-time Discount:** Create urgency by offering a limited-time Discount for users who decide to purchase the full course after accessing the preview content. This can drive conversions and encourage users to take action quickly.
For Courses with VIP tiers, consider creating separate Offers: one for limited access and another for VIP-exclusive content. This approach ensures clear differentiation and enhances the customer experience.
## Paywall best practices & troubleshooting
Label your Offers clearly, such as using "Limited Access" for paywalled versions, to avoid confusion. Additionally, ensure that shareable links for limited access offers are easily accessible from the Offers section.
* **Place the paywall** where it maximizes value — gate content after a free preview or introductory module
* **Preview as a customer** or use a test account to confirm the paywall works before publishing
* **Name gated sections** clearly so customers understand what they get after purchase
**Warning:** Moving the paywall only changes access for new enrollments and guests. Review existing customer access before making significant changes.
**Note:** If you do not see the paywall toggle, refresh the page and confirm you have permission to edit the Course.
## FAQs
### Can I paywall only specific lessons in a Course?
Yes. Mark specific lessons as paywalled in the Course editor so visitors can preview some content while premium lessons remain locked.
### Will existing students lose access after I enable a paywall?
No. Existing students who already have the appropriate purchase or access level retain access.
**Warning:** Double-check access settings if you use custom permission logic.
### Can I change the Offer Title after the paywall is enabled?
Yes. Update the Offer Title any time and click **Save changes**. Changes apply immediately to new visitors.
### How can I test the paywall before it is enabled?
Log out or open your site in an incognito window and try to access paywalled lessons to confirm the preview and Offer display correctly.
### Can I enable a paywall for paid tiers?
Yes, you can enable a paywall for upgrades even when both the base and add-on offers are paid products.
### How can I share a limited-access offer?
To share a limited access offer, navigate to the Offers section, locate the desired offer, and click **Get link** to copy the shareable URL.
### Customize a paywall modal
1. From the Dashboard, click **Products.**
2. Click **Courses** and open the Course you want to edit.
3. Click **Customize** to open the product theme editor.
4. Confirm that your product is using either the **Premier** or **Momentum** theme. If not, switch to one of these themes to access paywall customization.
5. In the theme editor, use the dropdown at the top of the page and switch from **Product** to **Post.**
**Note:** After switching to Post view, the **Paywall** option will only appear in the left sidebar if you have a paywalled lesson selected. If you do not see **Paywall** in the sidebar, click into a lesson that is locked behind the paywall and the option will appear.
6. In the left sidebar, click **Paywall.**
7. Toggle on **Edit Paywall Modal.**
8. Add and arrange any custom blocks you would like to display in the modal.
9. When you are finished editing, toggle off **Edit Paywall Modal.**
10. Click **Save** to apply your changes.
## Preview the paywall modal
1. Return to your **Course** outline
2. In the top right corner, click the eye button to **Preview**
3. Select **Preview Limited Access**
4. Click into any locked lesson to view your paywall modal
Your updates will now display whenever a student attempts to access a lesson restricted by your paywall.
## Marketing with a Course paywall
Using a paywall as a **lead magnet** is an effective strategy for driving new customers to your Course. Here's how you can use your paywall to capture interest and convert visitors into paying customers:
* **Offer a preview module or lesson:** Allow potential customers to access the first module or a specific lesson in your Course for free. This allows them to experience a part of the value you provide without giving away everything.
By default, your Course paywall will be created directly below the first module. However, you can adjust the placement to best fit your Course.
* **Create a sneak peek video:** Provide a sneak peek video or webinar that introduces your course content. After the preview, prompt users to unlock the rest of the course by purchasing.
* **Set up a limited-time Discount:** Create urgency by offering a limited-time Discount for users who decide to purchase the full course after accessing the preview content. This can drive conversions and encourage users to take action quickly.
For Courses with VIP tiers, consider creating separate Offers: one for limited access and another for VIP-exclusive content. This approach ensures clear differentiation and enhances the customer experience.
## Paywall best practices & troubleshooting
Label your Offers clearly, such as using "Limited Access" for paywalled versions, to avoid confusion. Additionally, ensure that shareable links for limited access offers are easily accessible from the Offers section.
* **Place the paywall** where it maximizes value — gate content after a free preview or introductory module
* **Preview as a customer** or use a test account to confirm the paywall works before publishing
* **Name gated sections** clearly so customers understand what they get after purchase
**Warning:** Moving the paywall only changes access for new enrollments and guests. Review existing customer access before making significant changes.
**Note:** If you do not see the paywall toggle, refresh the page and confirm you have permission to edit the Course.
## FAQs
### Can I paywall only specific lessons in a Course?
Yes. Mark specific lessons as paywalled in the Course editor so visitors can preview some content while premium lessons remain locked.
### Will existing students lose access after I enable a paywall?
No. Existing students who already have the appropriate purchase or access level retain access.
**Warning:** Double-check access settings if you use custom permission logic.
### Can I change the Offer Title after the paywall is enabled?
Yes. Update the Offer Title any time and click **Save changes**. Changes apply immediately to new visitors.
### How can I test the paywall before it is enabled?
Log out or open your site in an incognito window and try to access paywalled lessons to confirm the preview and Offer display correctly.
### Can I enable a paywall for paid tiers?
Yes, you can enable a paywall for upgrades even when both the base and add-on offers are paid products.
### How can I share a limited-access offer?
To share a limited access offer, navigate to the Offers section, locate the desired offer, and click **Get link** to copy the shareable URL.