

What are Live Rooms?
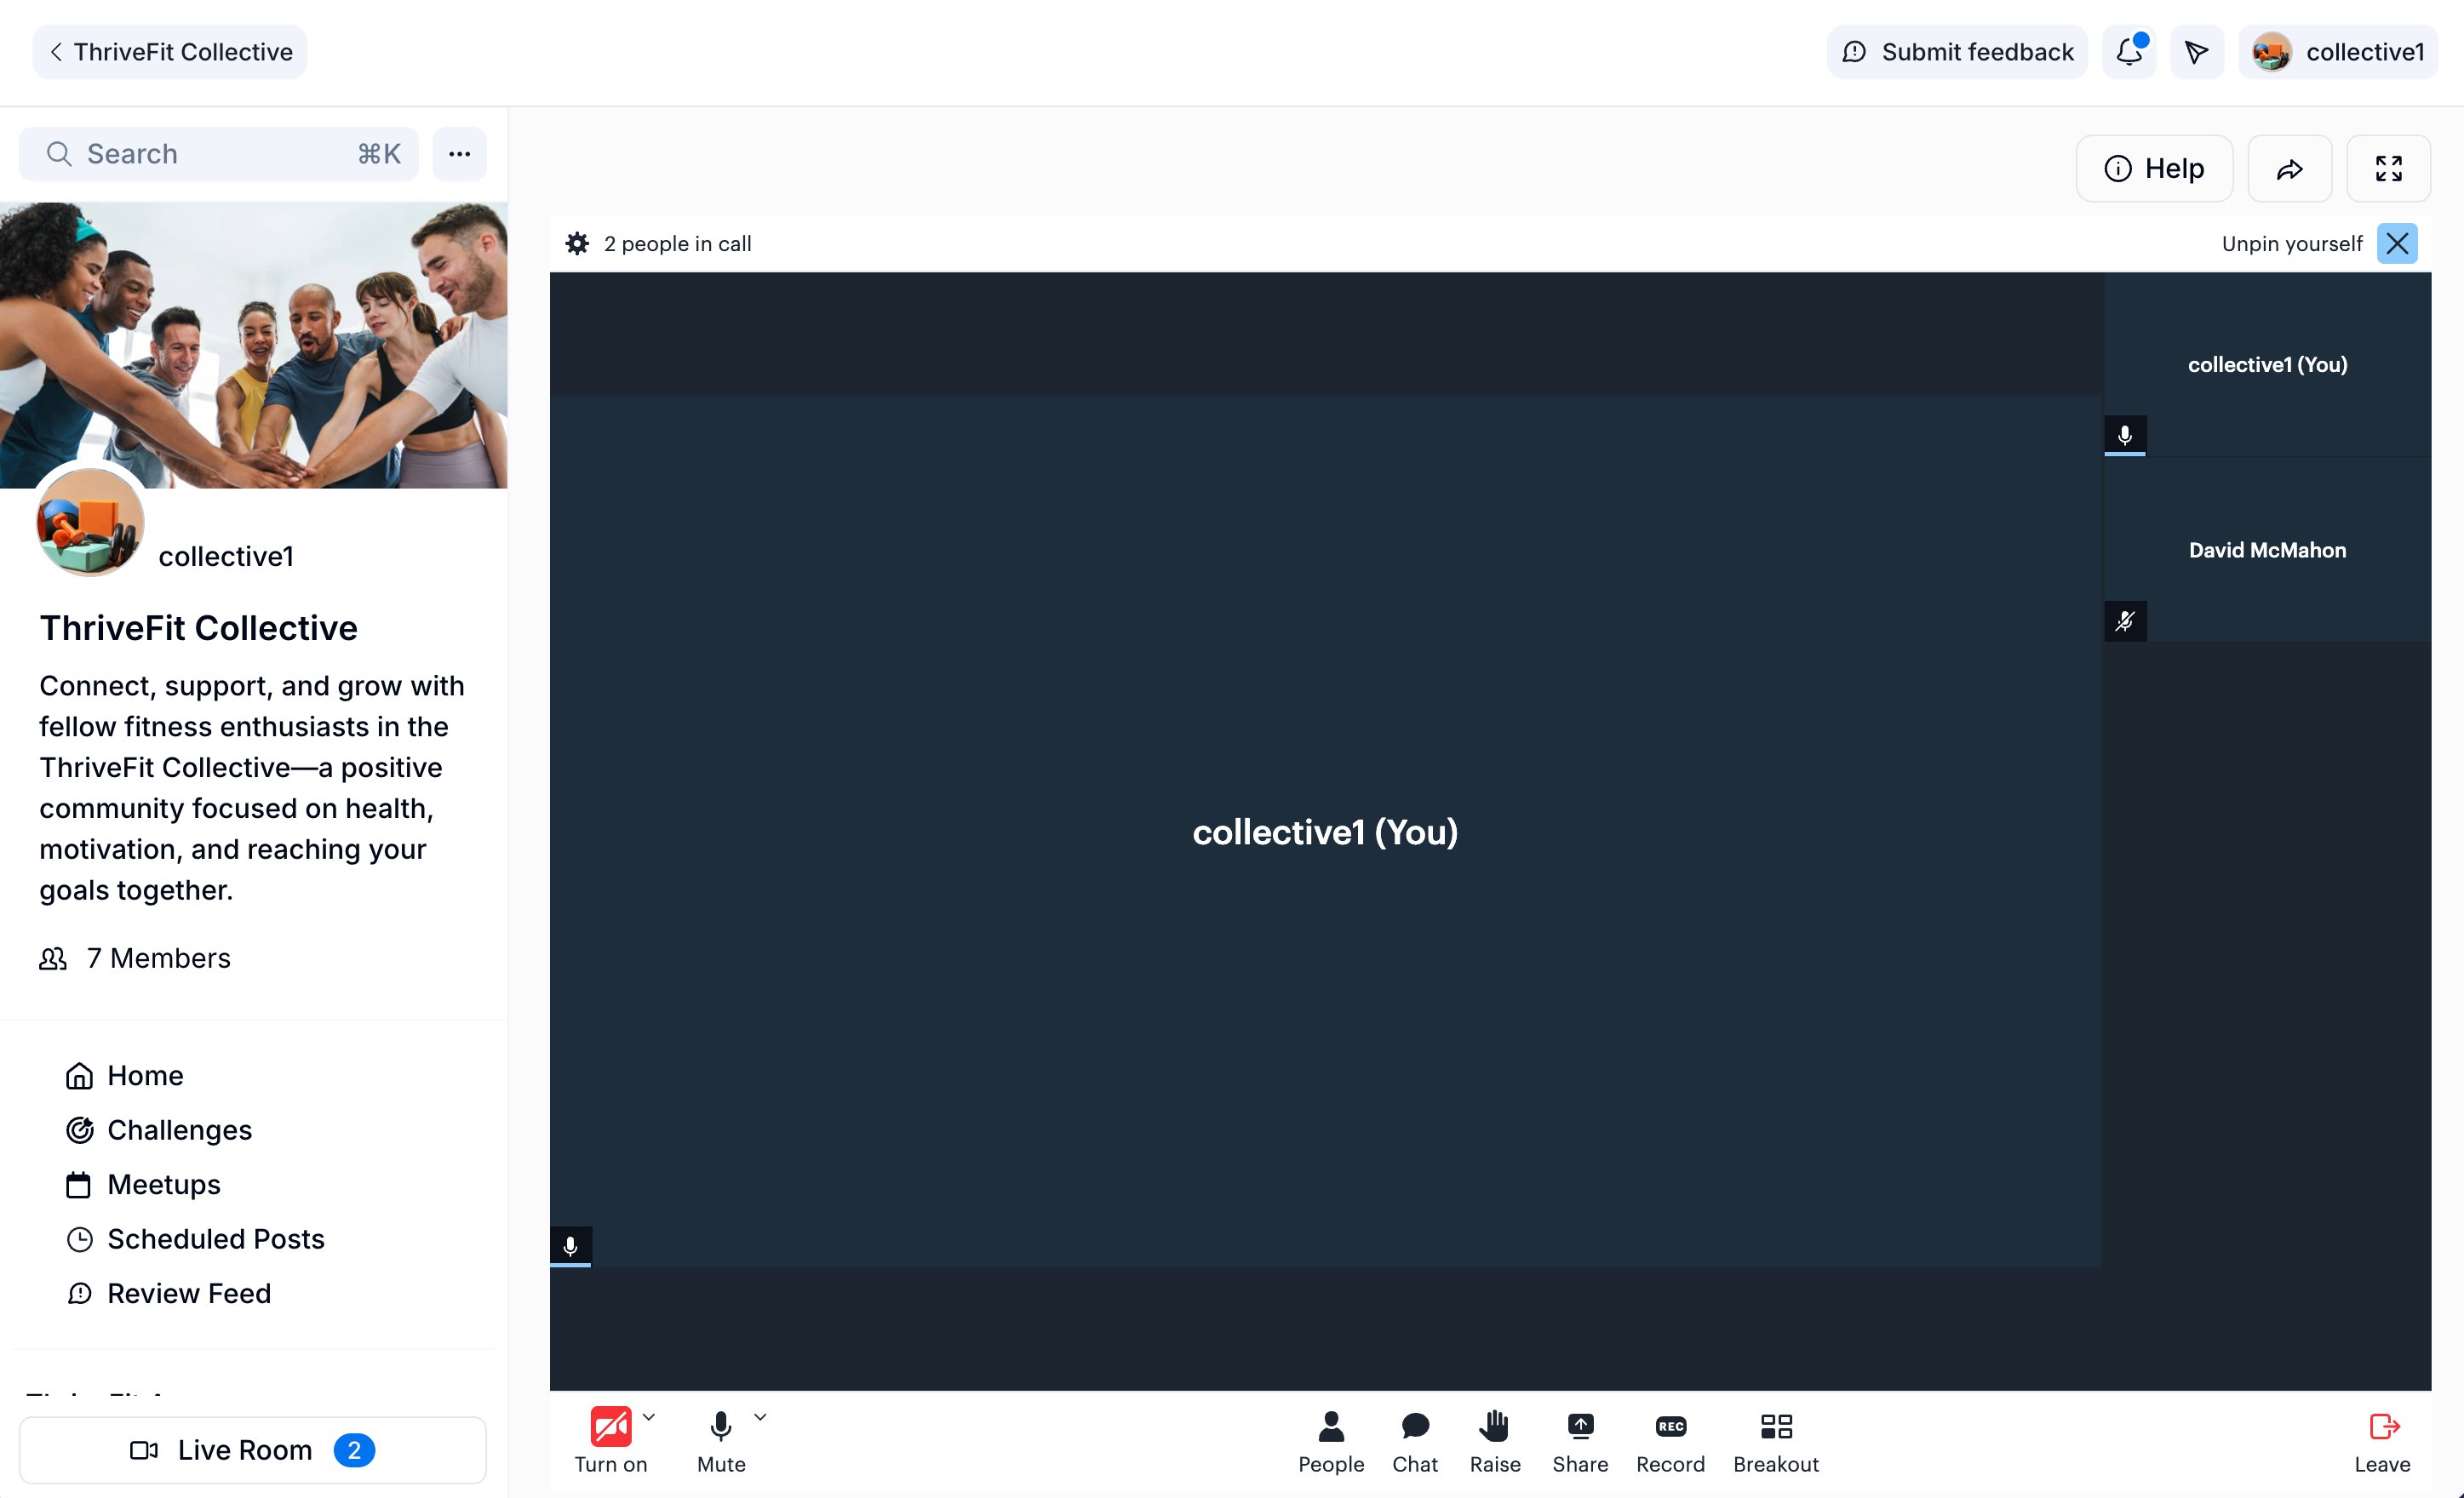
Live Rooms help you and your Community connect in real time by hosting meetings, Q&A sessions, workshops, and more with your members. The following tools are available in a Live Room:- Record your session
- Share your screen
- Start breakout groups
- Chat with everyone in the call, and download the chat afterward
- Raise your hand to ask to speak
- Pin a participant to the main view
- Switch between Speaker view and grid view
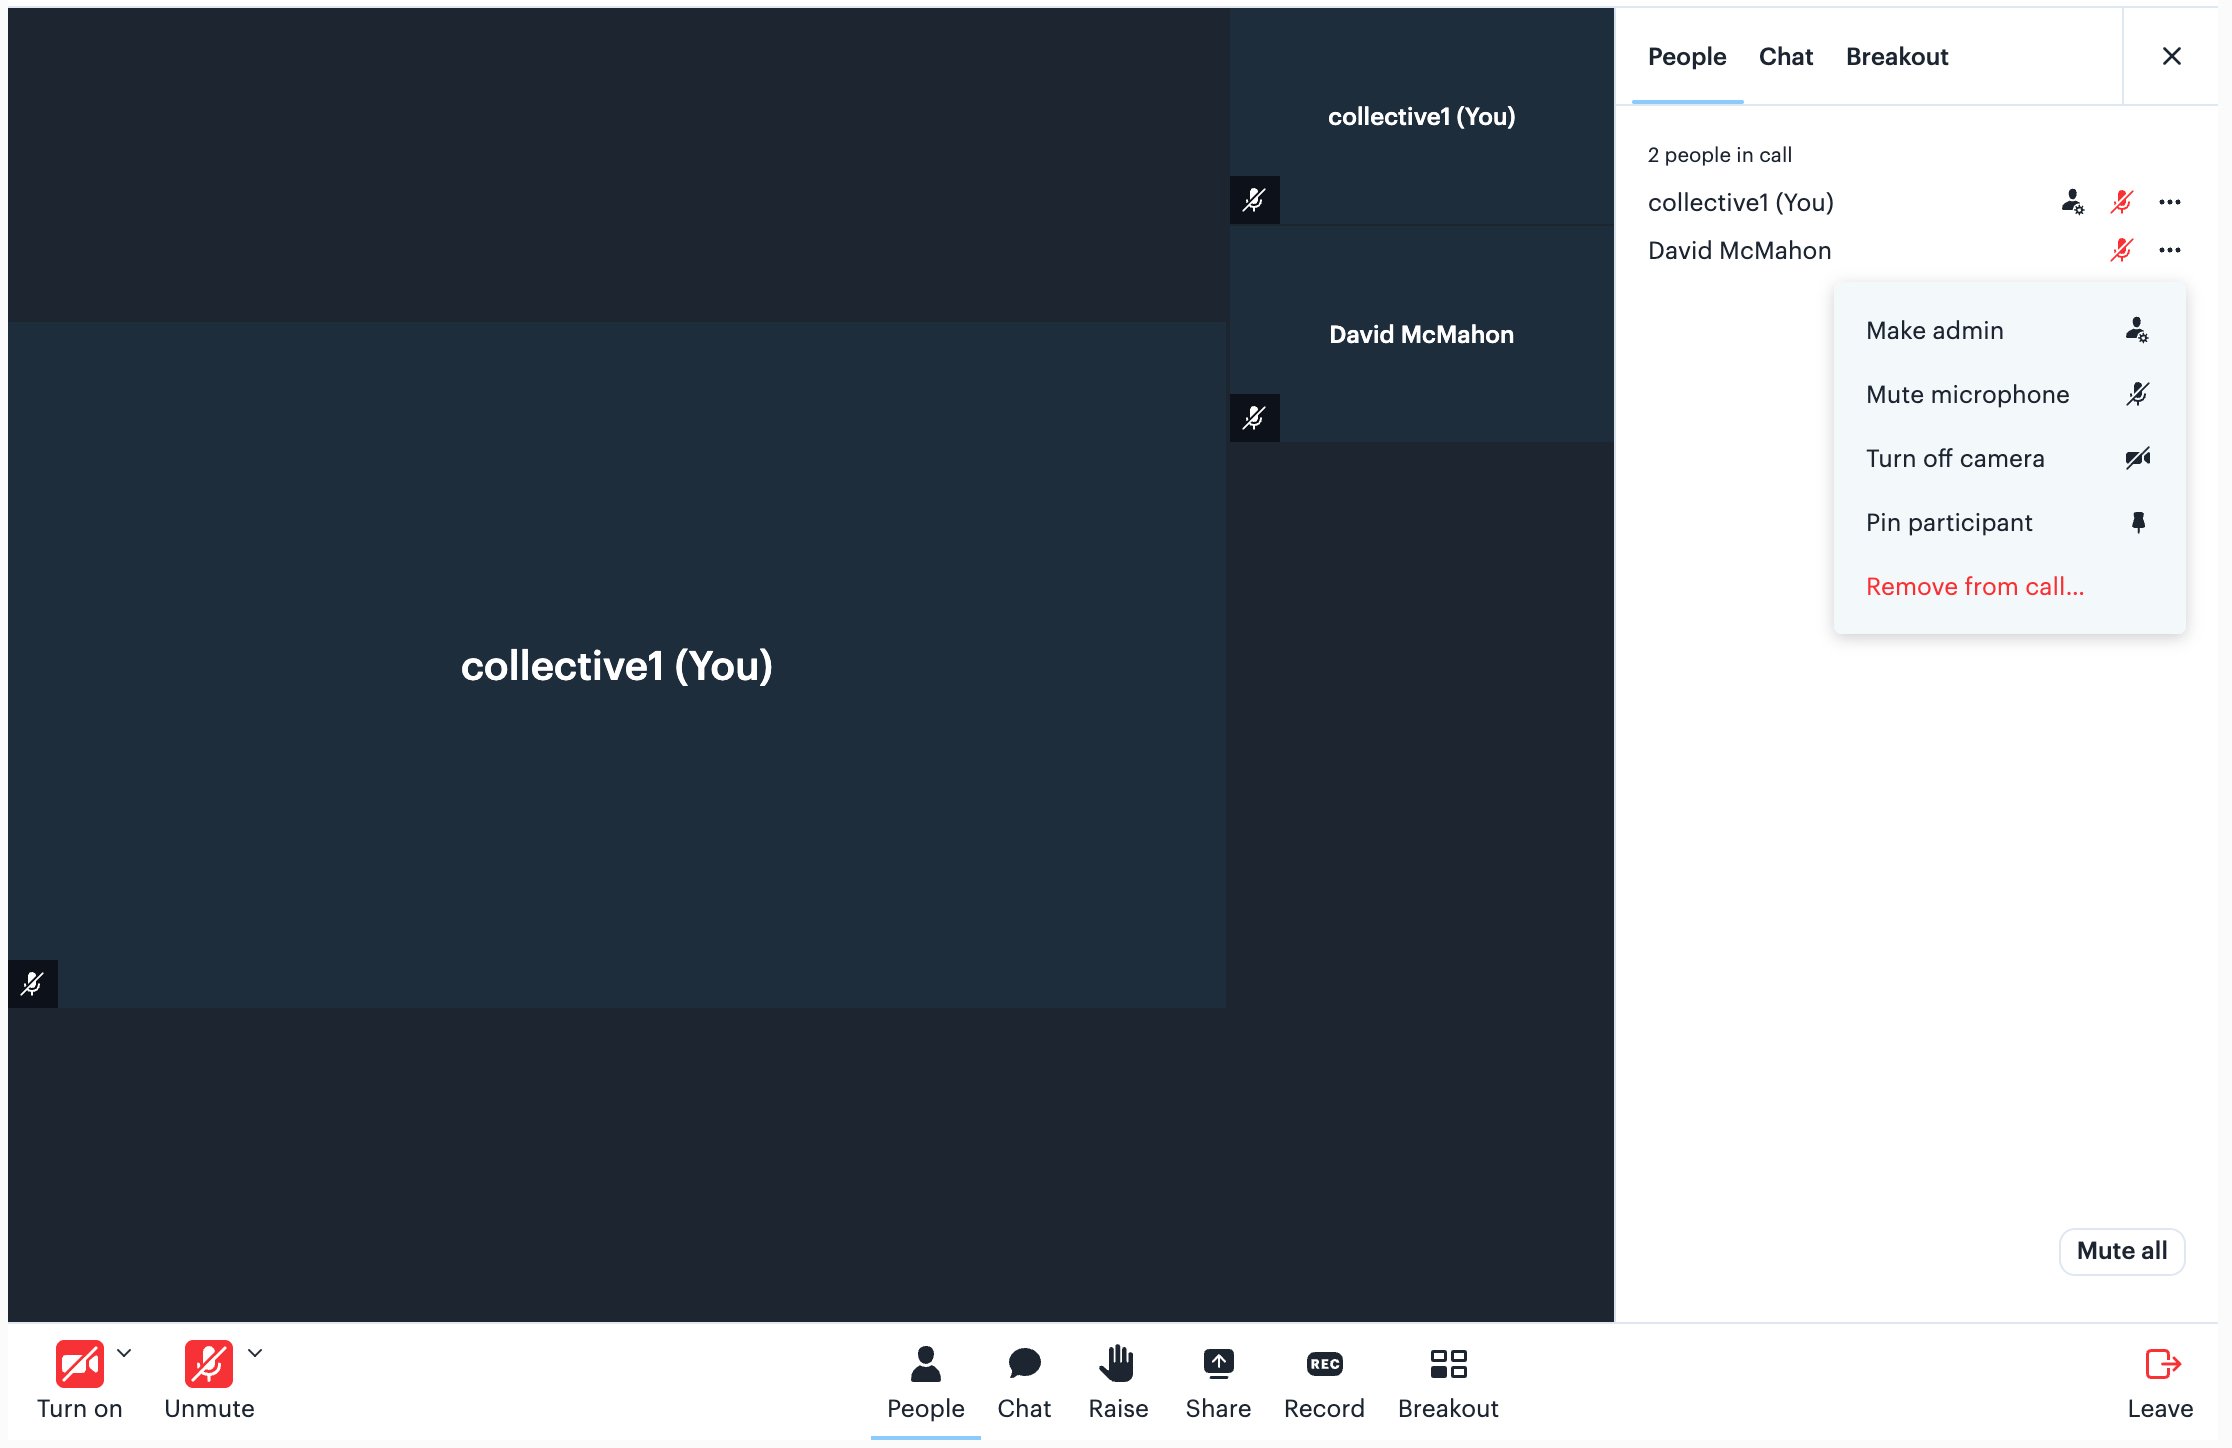
- Mute a participant’s microphone, turn off their camera, or mute everyone with Mute all
- Remove someone from the call, or make them an admin
Start a Live Room
Open a Community Live Room
- From the Dashboard, click Products.
- Click Community.
- Click Go to Community.
- In the left navigation bar, click Live Room.
- Click Live Room to start a live room.
- Optional: Click Notify to notify your Community members that you are live, or click Don’t Notify to skip.
- Optional: Click Start Recording to begin recording immediately, or dismiss the prompt to start without recording.
Raise a hand to ask to speak
Click Raise in the Live Room toolbar to signal that you want to speak.See how many people are in a Live Room
The Live Room button in your Community’s left navigation bar shows how many people are in the room right now, so you can check before you join. The count appears only while someone is in the room. Once you are in the call, the same count appears at the top of the Live Room.End a Live Room
Click Leave in the bottom right corner of the Live Room to leave a session. What happens after you leave depends on which room you are in:- Your Community’s Live Room: the Live Room access setting decides whether the session keeps running. See Control when members can join.
- A Meetup’s Private Room: the session ends once the last host leaves, and everyone still in the call is disconnected.
- Click People in the Live Room toolbar.
- Click the more options (…) icon next to the person’s name.
- Click Remove from call.
Disable a Live Room
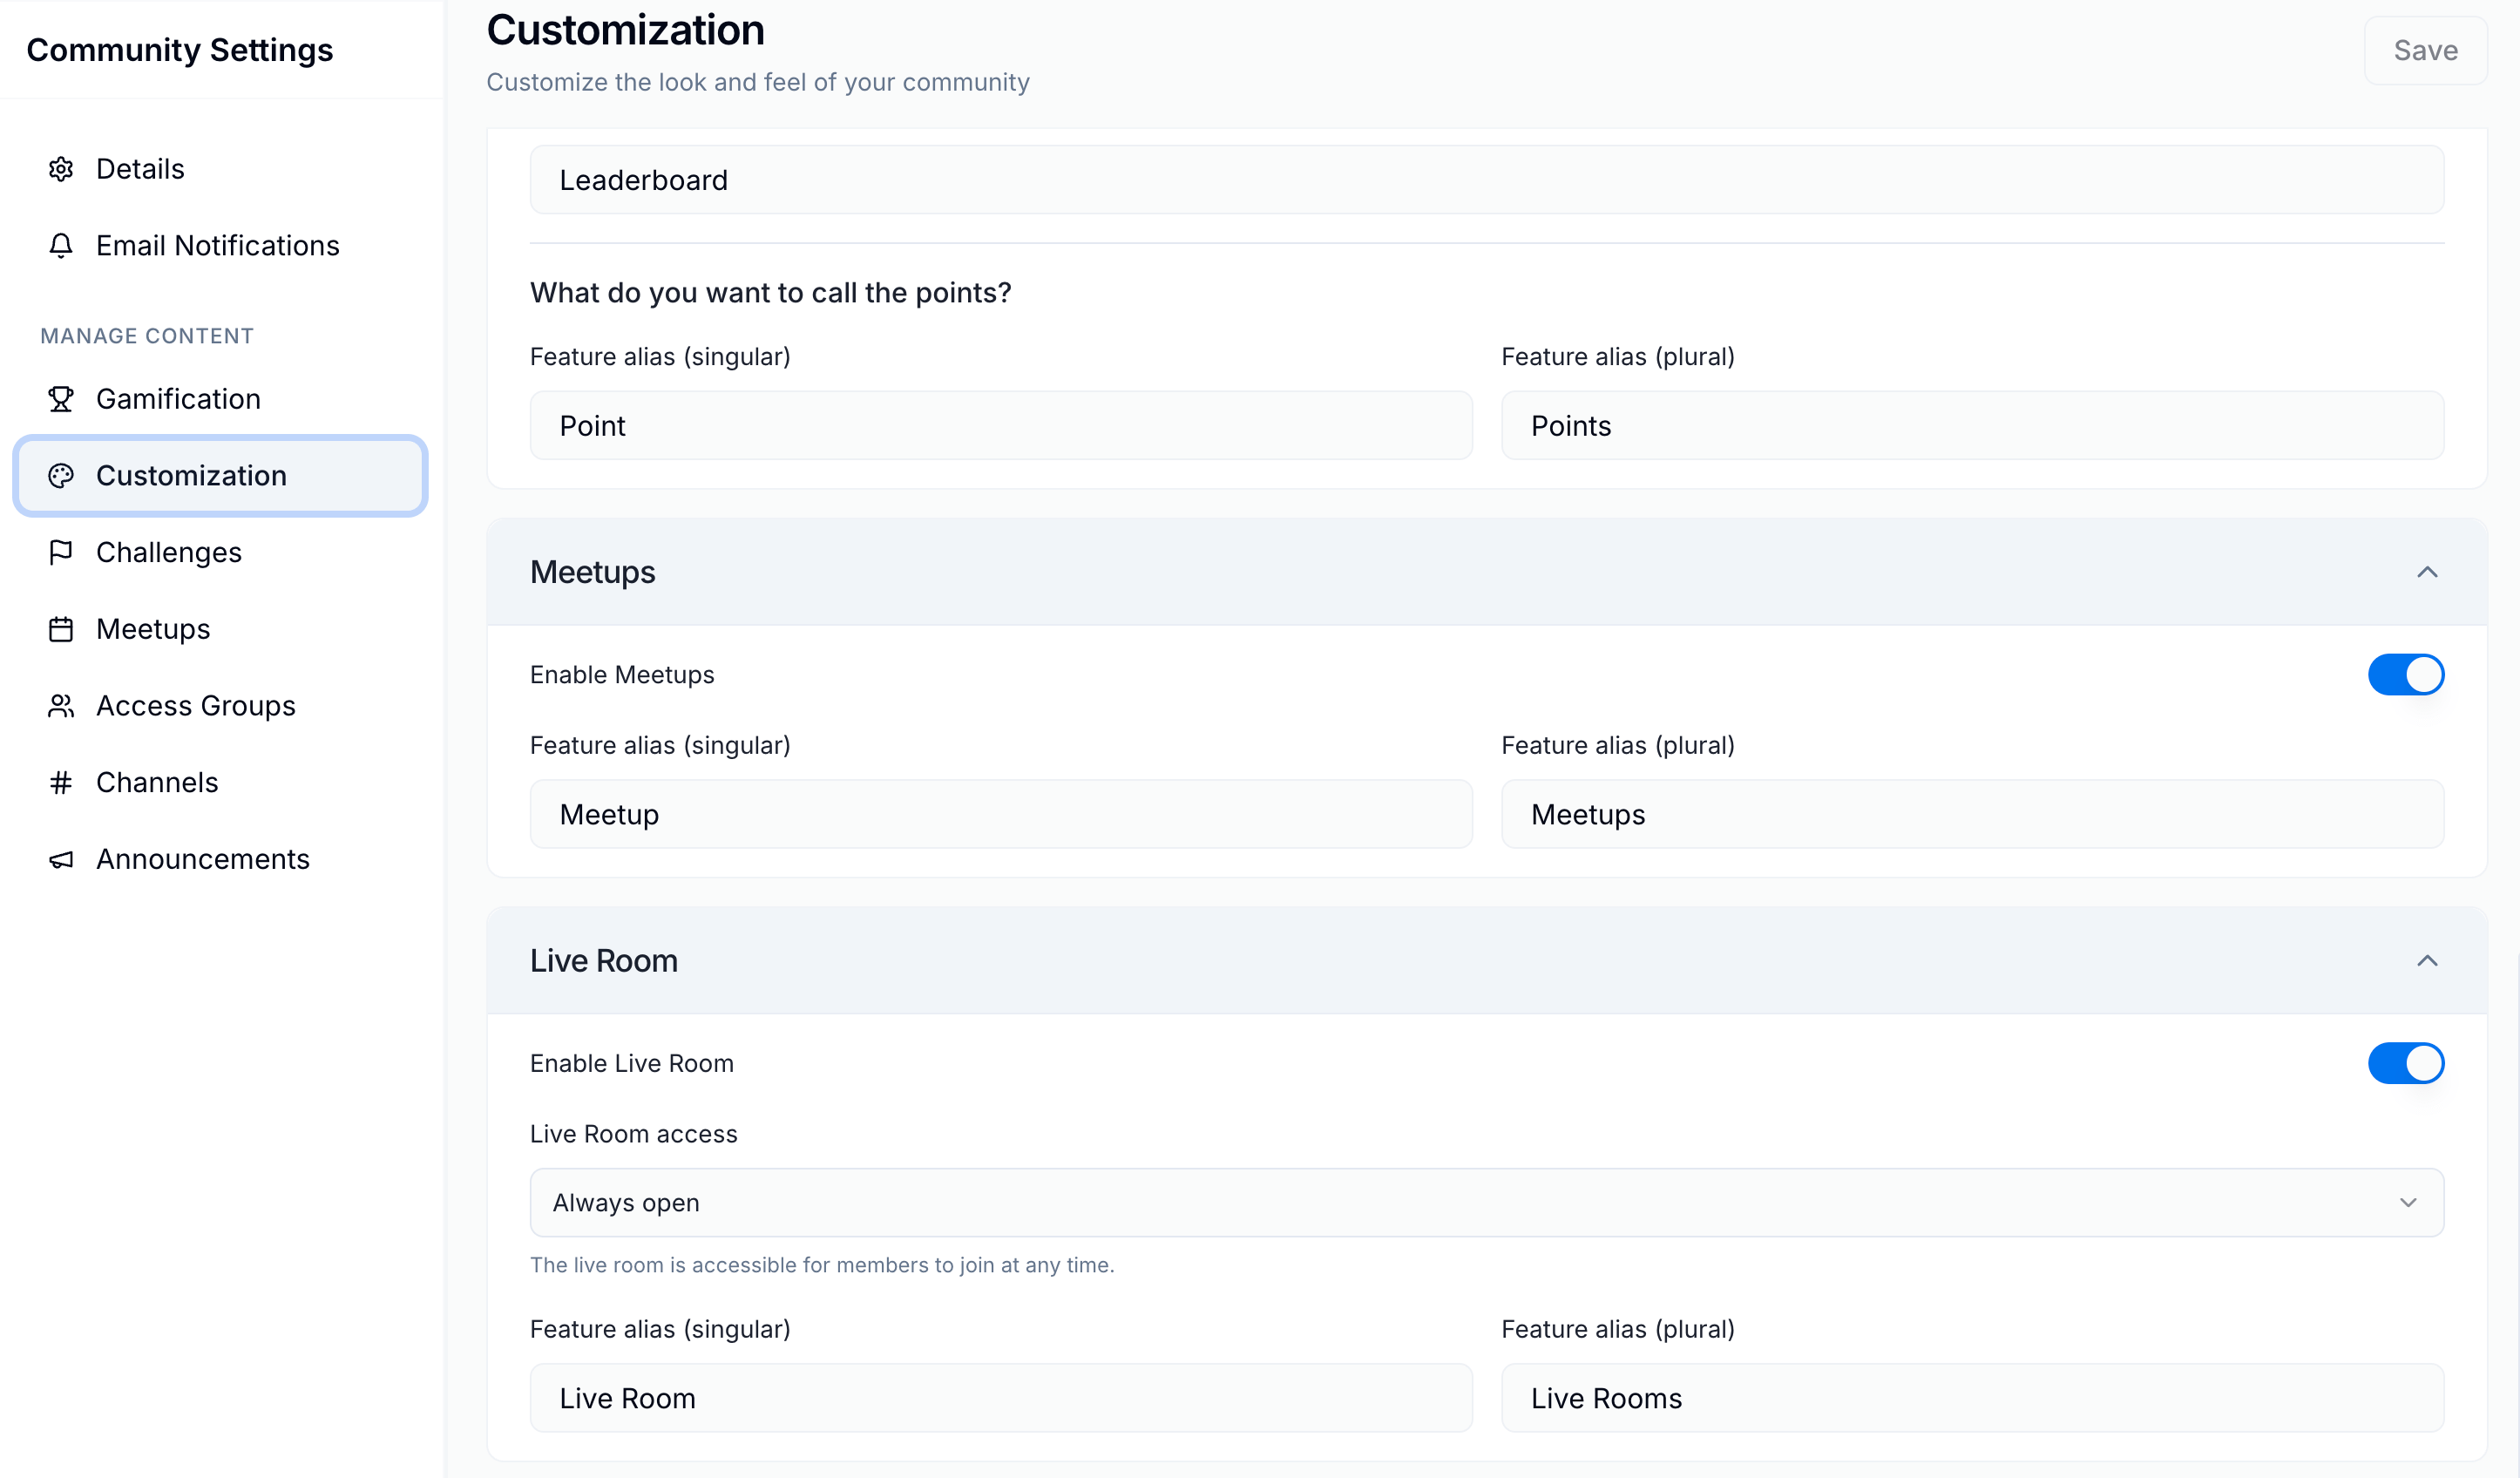
Turn off the Live Room if you do not want your Community to use it. If you only want members to join once you have started a session, leave the Live Room on and use the Live Room access setting instead. To turn off your Live Room:- Open your Community Settings.
- Select Customization.
- Navigate to Features.
- Under the Live Room section, toggle off Enable Live Room.
Control when members can join
In the same Live Room section, use the Live Room access setting to control when Community members can enter:- Always open: members can join the Live Room at any time, whether or not you’ve started a session.
- Wait for access: members can’t enter until you start the Live Room.
Note: Always open is the default. This setting applies to your Community’s Live Room. A Meetup’s Private Room always waits for a host, whichever option you choose here.
Create a Meetup
- From the Dashboard, click Products.
- Click Community.
- Click Go to Community.
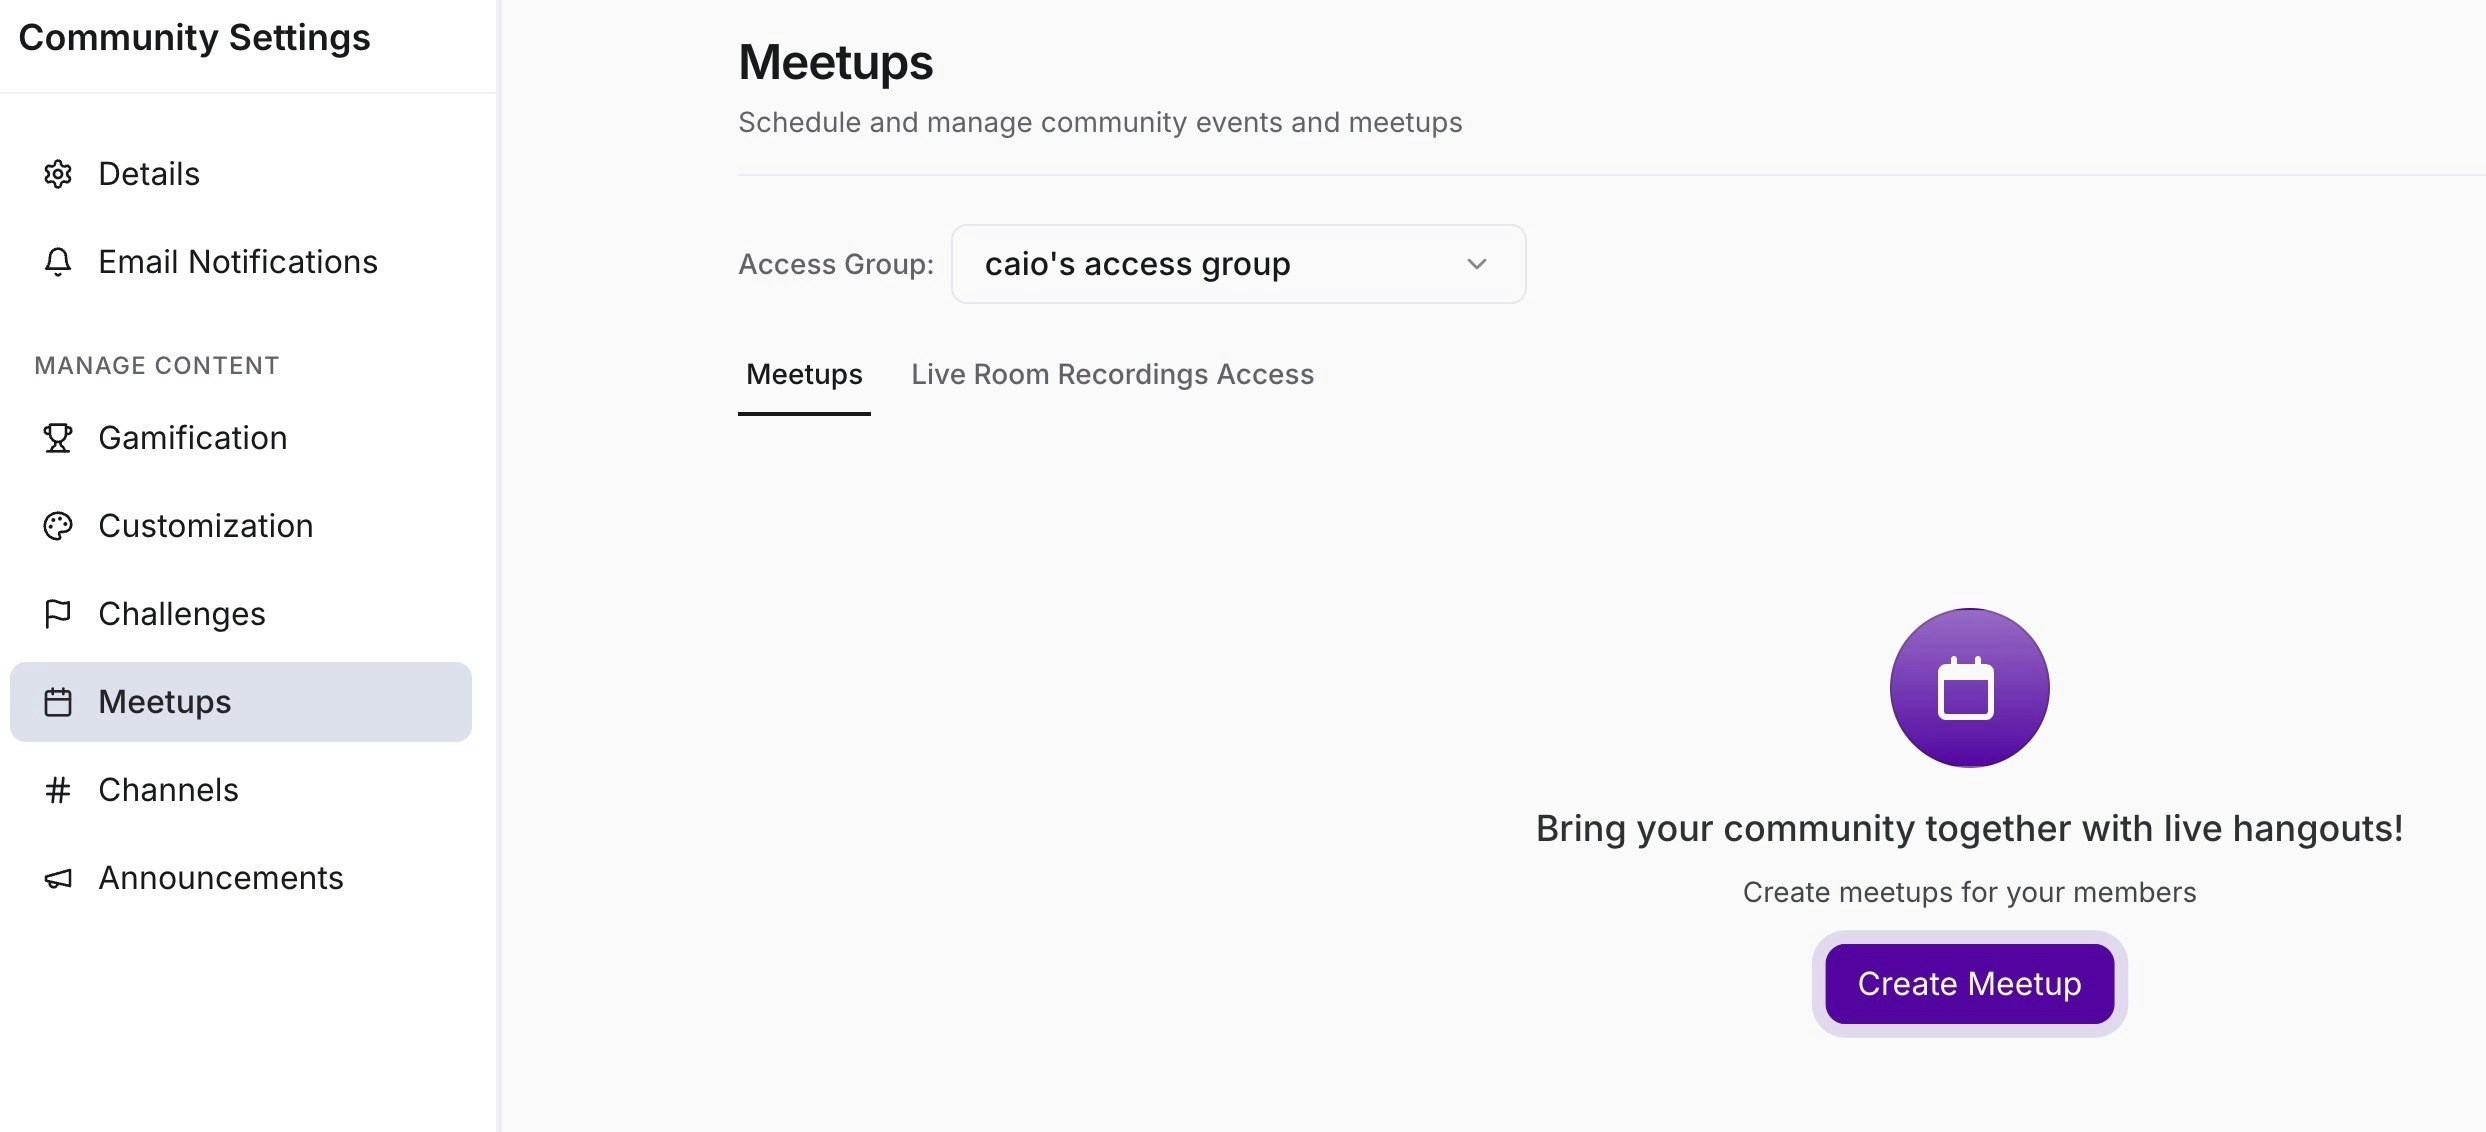
- In the left navigation bar, click Meetups.
- Click Settings in the top right corner.
- Click Create Meetup.
- Optional: Upload a cover image or video for your Meetup.
- Enter a Title.
- Enter the event link in the Location field for a virtual Meetup, or click Use Live and choose Use Live Room for your default Live Room or Create Private Room for a room limited to the Meetup’s Access Group. For in-person Meetups, enter the physical address.
- Set the Starts and Ends date and time.
- Set the Timezone.
- Optional: Select a Recurrence option to make it a repeating Meetup.
- Add a Description.
- Assign the Access Group.
- Optional: Select a Channel to receive in-app updates.
- Click Create Meetup.
Keep a Live Room safe and private
When you create or edit a Meetup, click Use Live next to the Location field. In the window that opens, click Use Live Room to use your default Live Room, or Create Private Room to make a room just for this Meetup: Your default Live Room will be accessible to all members of your Community, whereas a Private Room will only be accessible to the Access Group members who are invited to your Meetup. A Private Room also waits for a host. Members who open it before a host arrives see a waiting screen and cannot start the session themselves. Once the last host leaves, the session ends and everyone still in the call is disconnected. Leaders, admins, moderators, and assistants all count as hosts. To moderate a session that is already running, use the People panel in the Live Room:- Click People in the Live Room toolbar.
- Click the more options (…) icon next to a person’s name.
- Click Mute microphone or Turn off camera to control their audio and video, or click Remove from call to remove them from the session.
- Optional: Click Mute all at the bottom of the People panel to mute everyone at once.
Screen sharing, breakout rooms, and recording
Screen sharing, breakout rooms, and recording are all available through the admin controls in both the default Live Room and Private Rooms.Record a Live Room
- Click the Record button in the Live Room toolbar to begin recording.
- When recording is active, the Record button turns red and changes to Stop, and a red Recording indicator with a running timer appears at the top of the call.
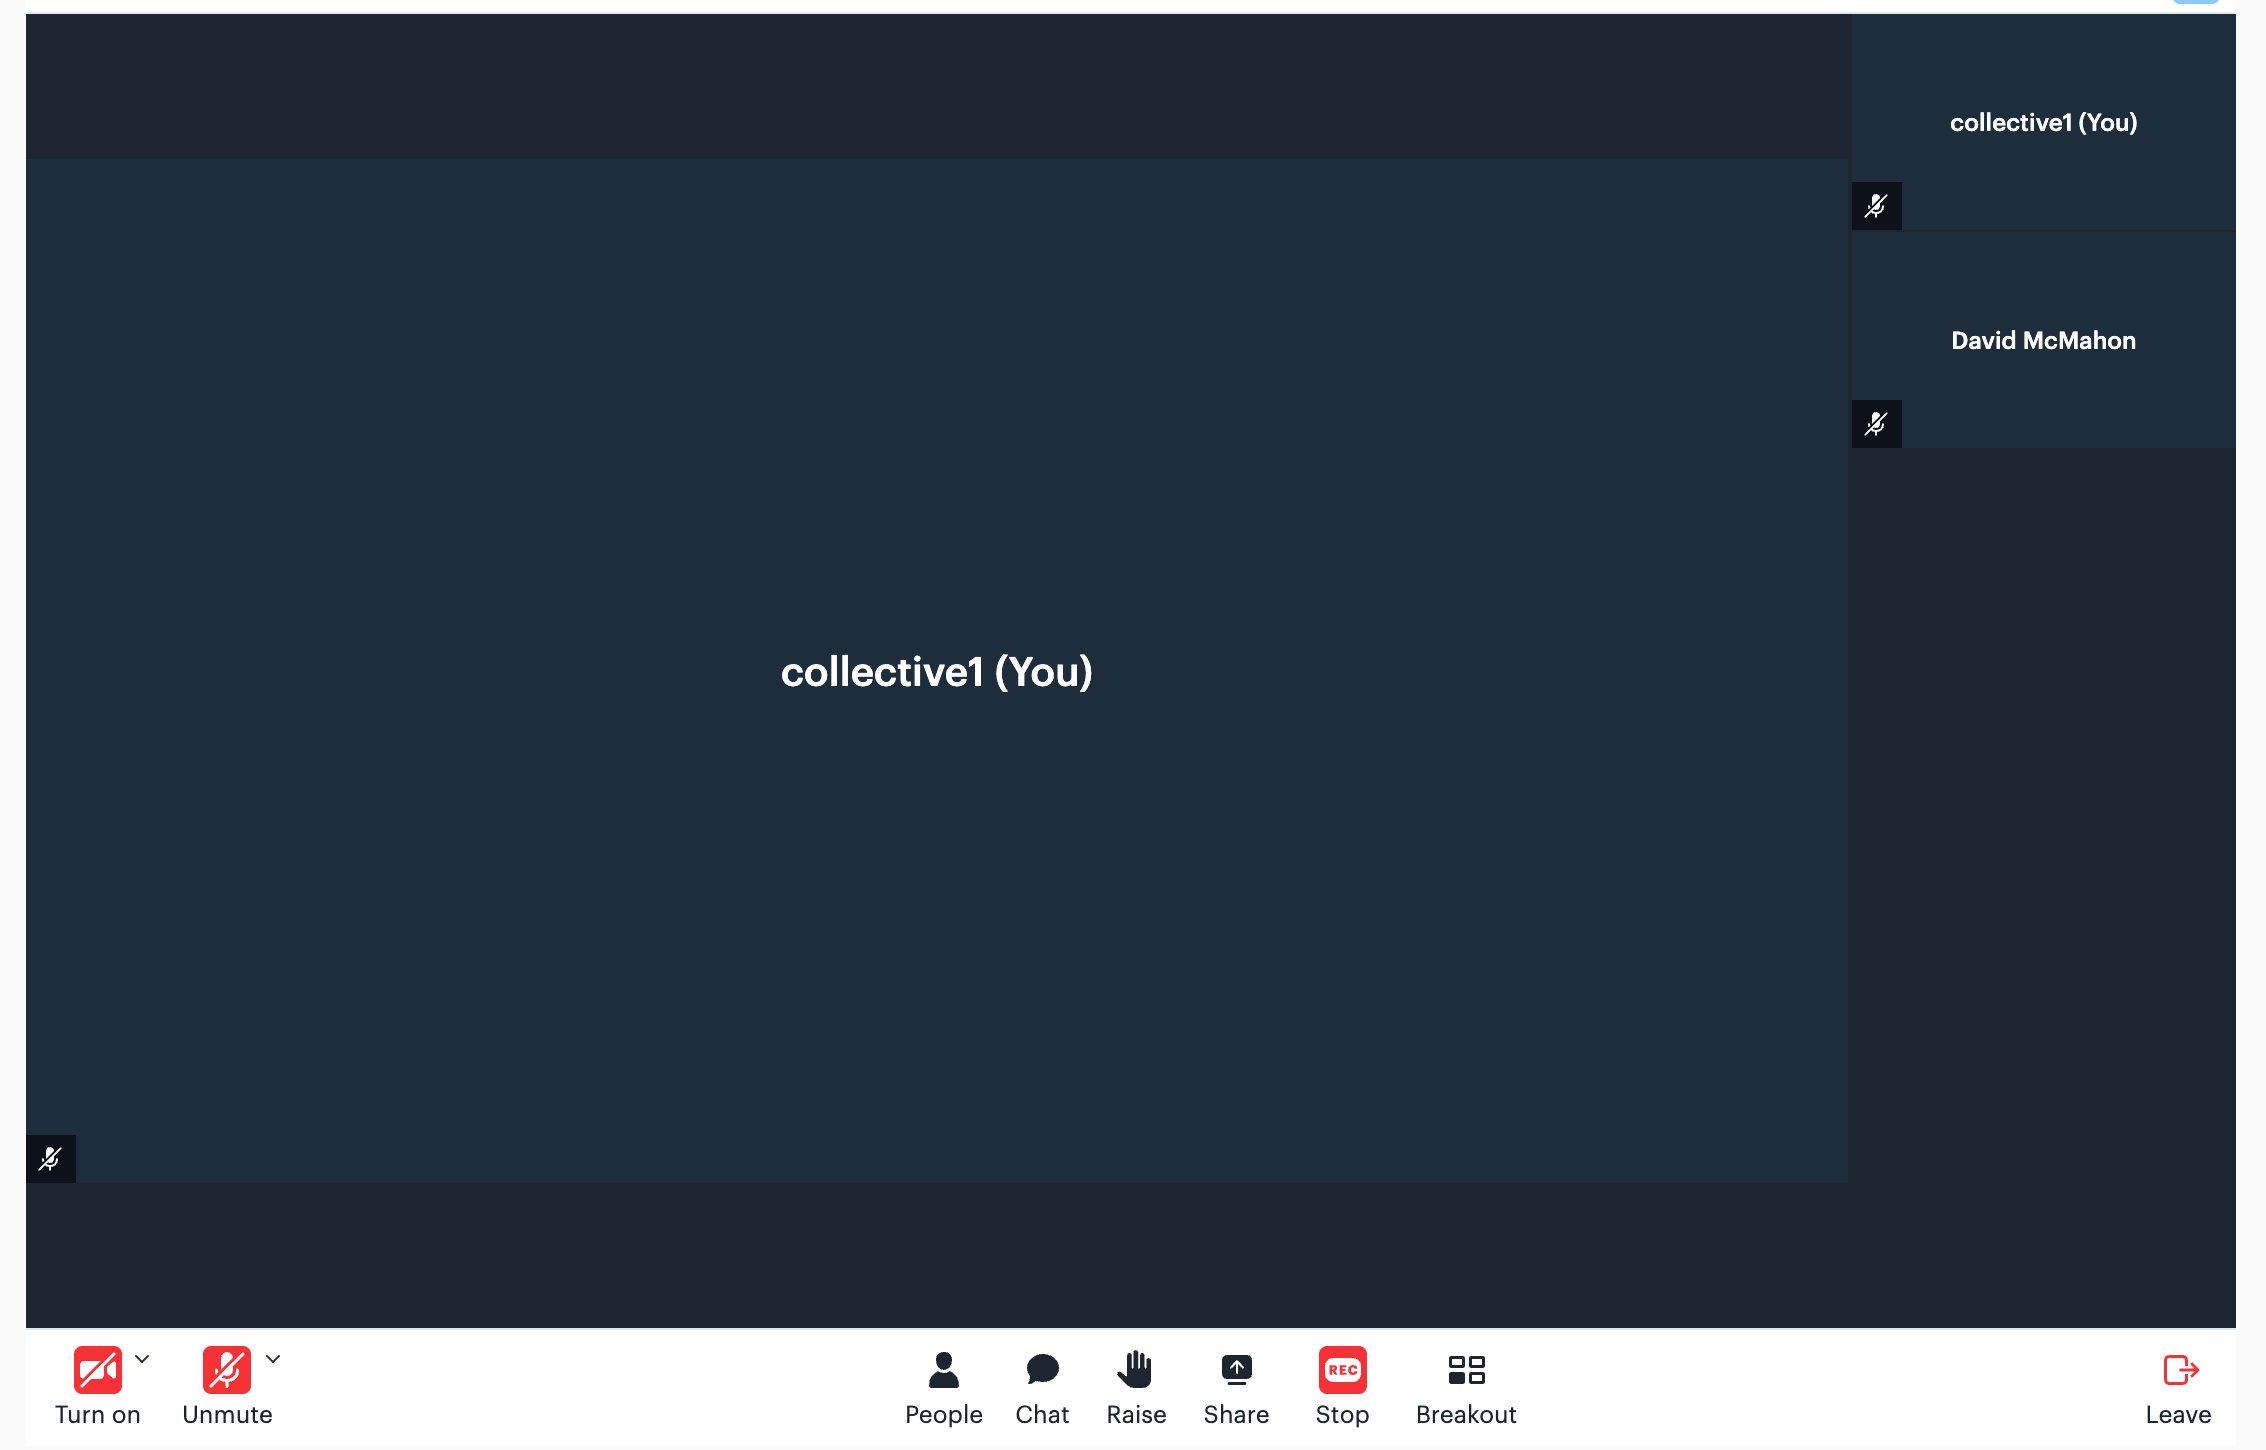
- Click the Stop button to stop recording.
Find Live Room recordings
Your recordings can be viewed in the Meetups tab under Recordings. The Download option is available to Community leaders, admins, moderators, and assistants.- From the Dashboard, click Products.
- Click Community.
- Click Go to Community.
- Click Meetups in the left navigation bar.
- Locate the recording you want to download.
- Click the more options (…) icon on the recording.
- Click Download.
Edit and control access to a Live Room recording
Determine the Access Group that can view your Live Room recording:- From the Dashboard, click Products.
- Click Community.
- Click Go to Community.
- Click Meetups in the left navigation bar.
- Click the more options (…) icon next to your Live Room recording.
- Click Edit.
- Update the Title, Access Group, or Description as needed, or click Delete to remove the recording.
- Click Save.
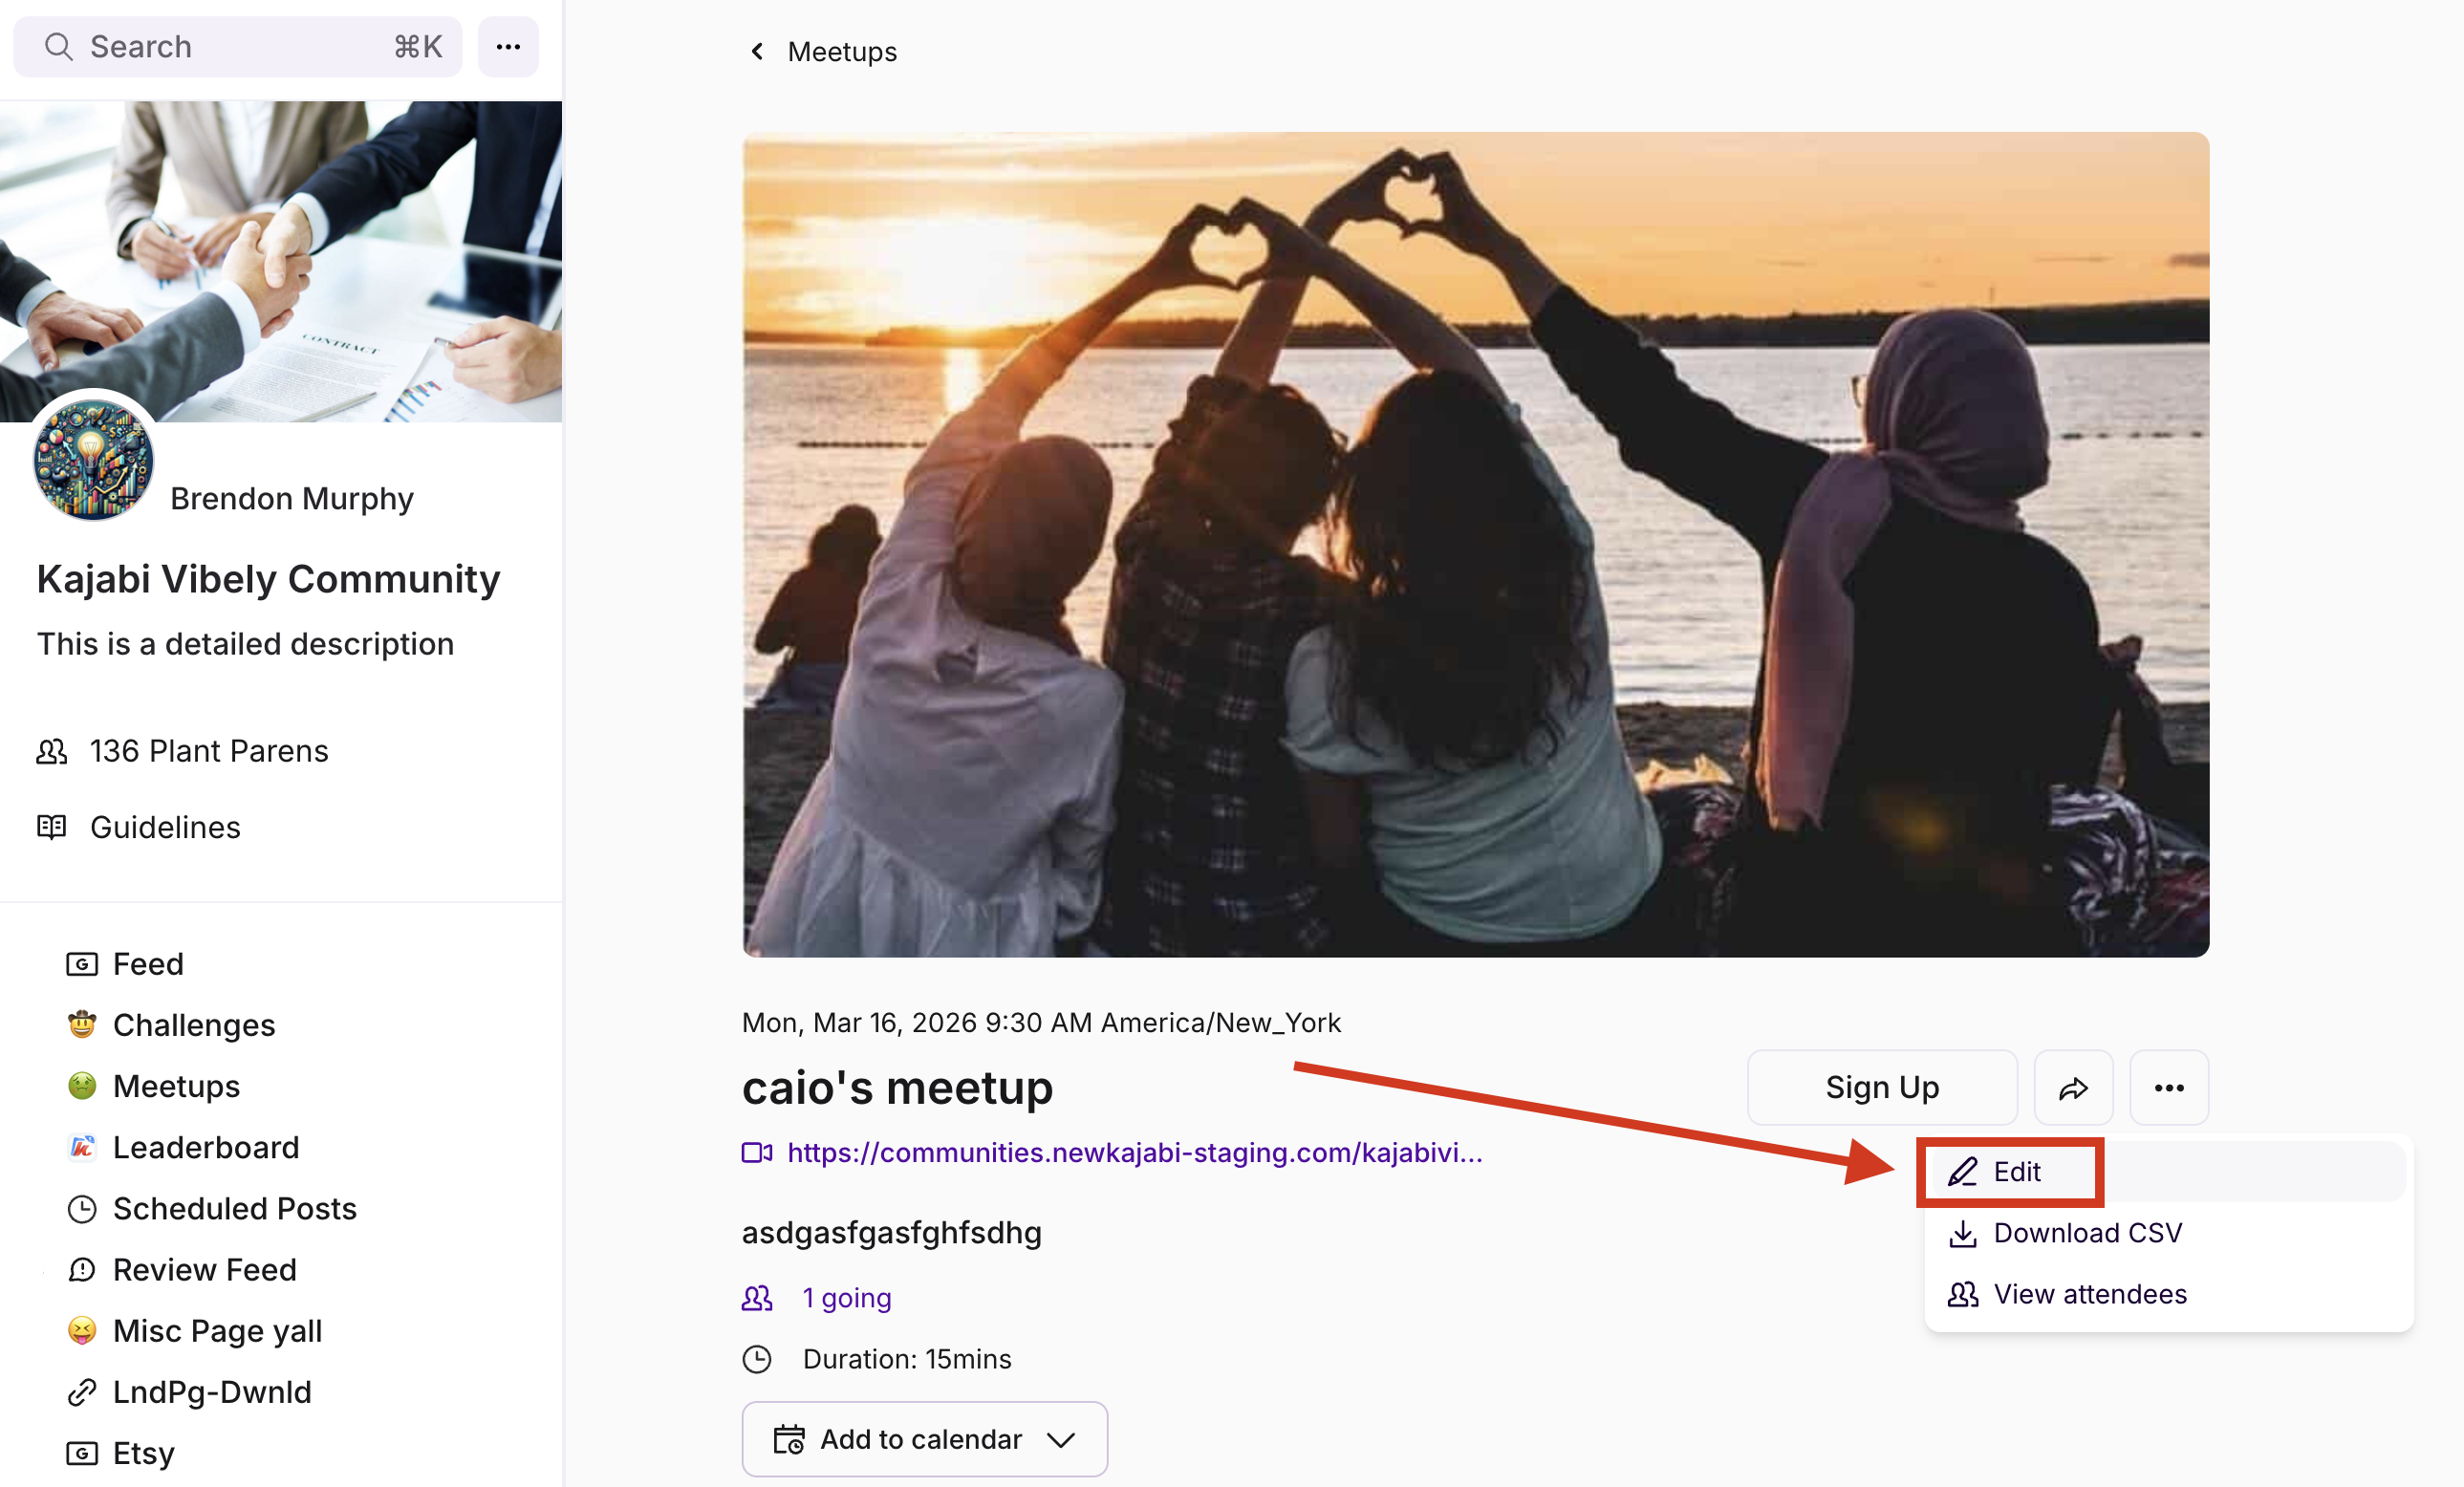
Edit a Meetup
Change a Meetup you have already created when the time, link, description, or audience shifts.- From the Dashboard, click Products.
- Click Community.
- Click Go to Community.
- In the left navigation bar, click Meetups.
- Click Settings in the top right corner.
- Find the Meetup in the list, then click its name. You can also click the more options (…) icon in that Meetup’s row and click Edit.
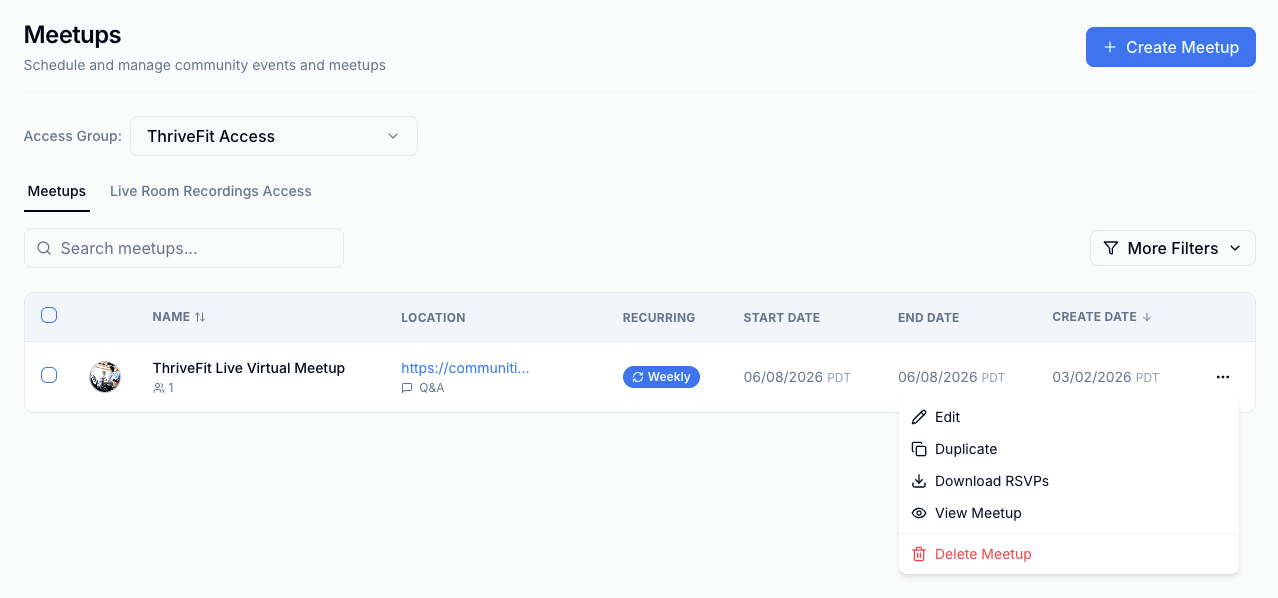
- Update the cover image or video, Title, Location, Starts and Ends, Timezone, Recurrence, Description, Access Group, or Channel.
- Click Save.
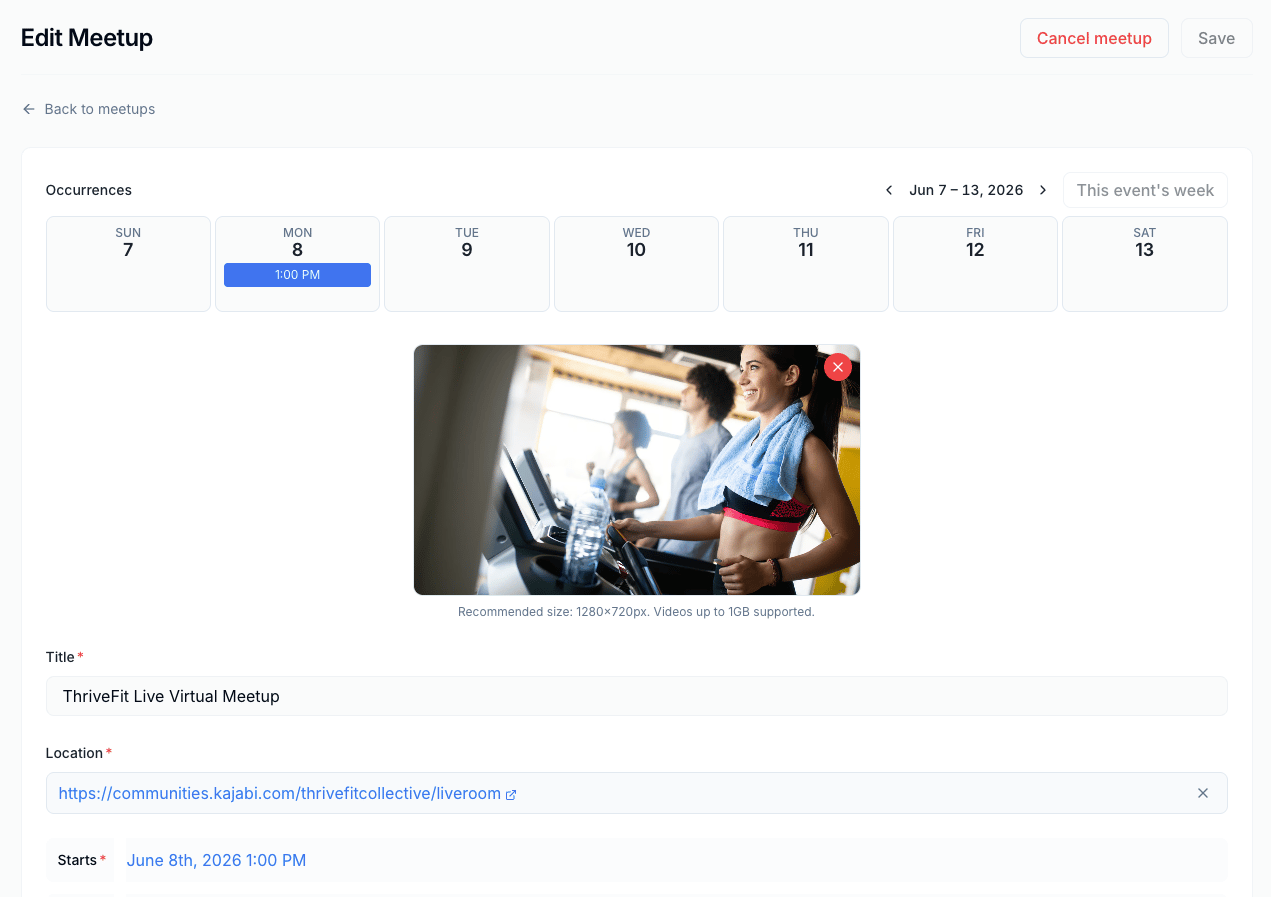
Note: For a Meetup that belongs to a recurring series, the Access Group is locked and cannot be changed, and saving asks whether to apply your changes to this event only, this and following events, or all events. A Cancel meetup button also appears, which offers the same three choices and removes those occurrences. See Create a Community Meetup for how recurring Meetups work.
Update an outdated Meetup link in a calendar
Meetups that use a Private Room are moving to a permanent Kajabi join link. Calendar entries that were added before that switch can still point at the older room link, so Kajabi shows a notice on the Meetup’s page titled Update this meetup in your calendar, asking the reader to remove the Meetup from their calendar and add it again to get the current join link. The notice uses whatever you have named Meetups in your Community settings, so it can read differently on your Community.
- It stops appearing once the Meetup has ended, so a Meetup saved without an Ends time keeps showing it
- It appears on Meetups that use a Private Room, not on Meetups that use the default Live Room, a physical address, or an outside meeting link such as Zoom
- Click the X in its corner to dismiss it. Dismissing applies to that one Meetup in that one browser, so it can reappear on another device
- Re-saving the Meetup without changing its Location does not remove the notice, because the stored room link is deliberately kept so existing sessions still resolve
Set a default Access Group
You can set a default Access Group, which means the members of that Access Group will automatically get access to your recordings. If you need to change the Access Group, you can do so after the recording is published.- In the left navigation bar, click Meetups.
- Click Settings in the top right corner.
- Under Live Room Recordings Access, select a Default Access Group. If you do not select one, a default group is automatically assigned.
- The page will save automatically.
Live Room recording resolution
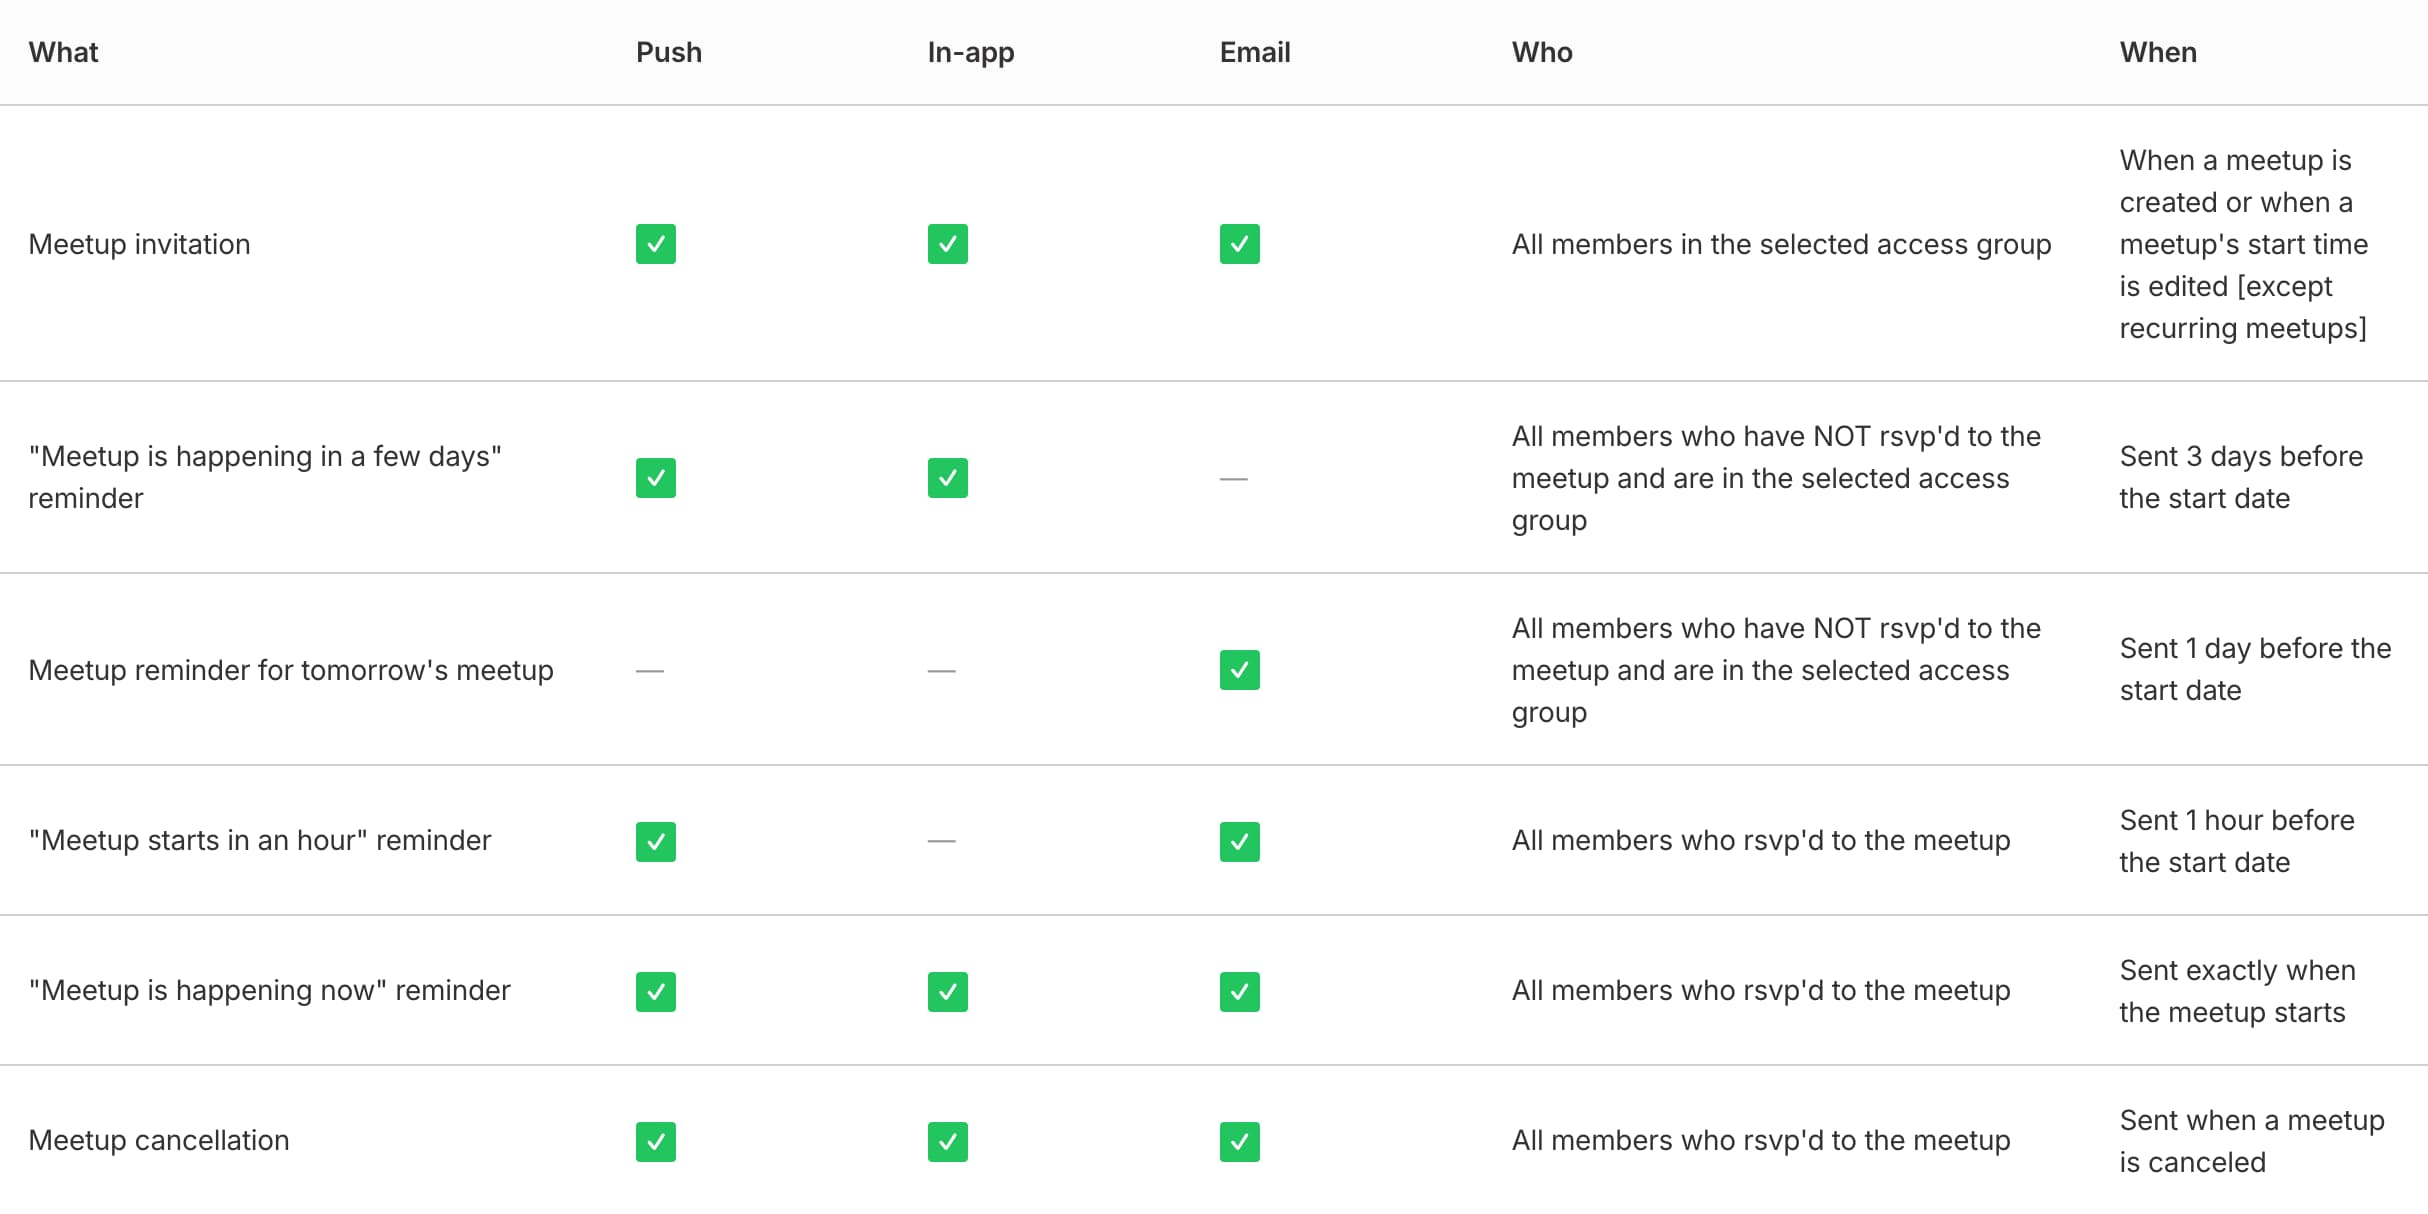
Live Room recordings are 1080p by default. If you lower your video quality during a session, which can help on a weak connection, the recording reflects that lower quality.Understanding Meetup Notifications
Community notifications are sent out in three ways:- Emails
- In-app notifications (in your notification center)
- Mobile notifications (push notifications)
- On an individual basis, in an individual’s profile settings
- By you, the Hero, at the community level in community settings
FAQs
Can I download a Live Room recording?
Yes. From the Meetups tab, click the more options (…) icon next to the recording and select Download. The Download option is available to Community leaders, admins, moderators, and assistants. See Find Live Room recordings above for the full steps.Can I change a Meetup after I create it?
Yes. Open Meetups in the left navigation bar, click Settings, then click the Meetup’s name to open it for editing. See Edit a Meetup above for the full steps.Why does a Meetup show a notice asking me to update it in my calendar?
That Meetup uses a Private Room, and its join link is moving to a permanent Kajabi link. Calendar entries added before the switch can still point at the older room link. Remove the Meetup from your calendar and add it again from the Meetup’s page to pick up the current link. See Update an outdated Meetup link in a calendar above.Are there any limits to how many people can be in a Live Room?
You can host up to 200 people at once in your Community Live Room. There is no separate limit on how many people can have their camera on at the same time. When more cameras are on than fit on the screen, the Live Room pages through them, and you can move between pages.Why are members waiting to join a Meetup’s Private Room?
A Private Room does not open until a host joins, so members who arrive first see a waiting screen. That screen watches for you to start the session and lets them in on its own, for up to 15 minutes. Nobody needs to refresh anything. If no host has started the session within those 15 minutes, the screen stops watching. It still looks like it is waiting, but it will not let anyone in, even after you start. Ask those members to open the Meetup and click into the room again, which starts a fresh wait. Leaders, admins, moderators, and assistants can all open the room.Why is my Live Room recording missing?
A few common reasons a recording doesn’t show up:- Recording wasn’t started. Recording only happens if you click Start Recording when prompted, or click the Record button in the Live Room toolbar during the session. If neither happens, no recording is created, and there is no automatic recording.
- Still processing. Shorter recordings appear in the Meetups tab under Recordings in less than 5 minutes; longer recordings can take up to 30 minutes.
- Access Group restriction. If you can’t see a recording that you know exists, check that you’re a member of the Access Group it’s assigned to.
- Deleted. Recordings can be removed from the Edit menu next to a recording, so if one was there before and isn’t now, it may have been deleted. If you’ve checked all of the above and a recording is still missing more than 30 minutes after the session ended, reach out to Kajabi Support.